
Wednesday, September 16, 2009
A Scrapbooking History Collage
Check out this awesome collage history of scrapbooking, from a scrapbooker in Greece


Faux Shaving Cream
by Beate Johns 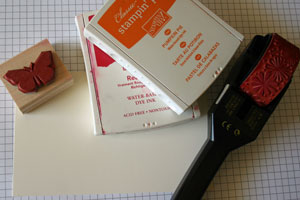
Create a marbled look on your stamped image.
Supplies
- Stamping Wheel
- Solid Stamp
- Dye Inks
- Neutral Cardstock
- Marker (optional)
Step-by-Step
-
Step 1
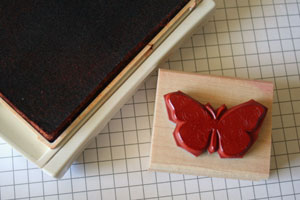
Ink up your solid stamp with one of your classic ink colors.
-
Step 2
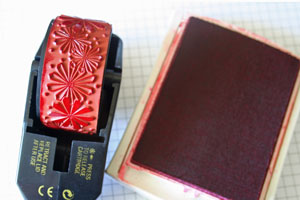
Ink up your Stamping Wheel either with an ink cartridge or by rolling over another ink pad with a complimentary color.
-
Step 3
Place your Wheel on your solid stamp and twist it.
You can also swipe the wheel over the stamp.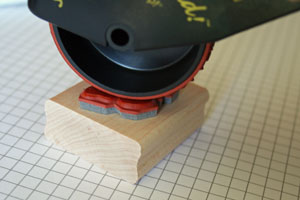
-
Continue to twist or swipe your wheel until you have transfered enough ink from your wheel to your stamp.
This will create your marbled look.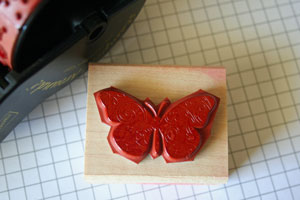
-
Step 4 (Optional)
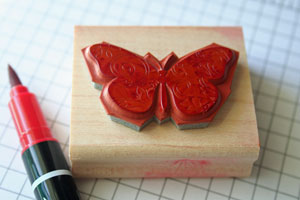
Use a marker to outline your solid stamp. I used the same color that the wheel was inked up with.
-
Step 5
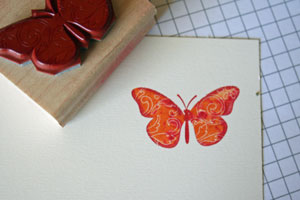
Huff on your stamp. That will remoisten the image. Now stamp your image on neutral cardstock.
-
Step 6
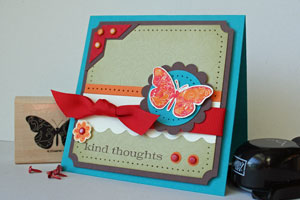
Finish your card.
Your Turn
You've seen the tutorial, now you try it! We've got a section of the gallery set aside for Faux Shaving Cream. Try this technique, then upload your artwork to the gallery. Show us your creations!
Stamping Techniques Video
Watch this video for a look at such stamping techniques as masking, creating embellishments and faux watercolour effects using chalks. All of the techniques covered are simple, easy to achieve and stunning when applied to any form of project you may have in the works! Also be sure to check the Whispers Brush Marker video, a very useful item for use in your stamping projects! For more information & inspiration, vist www.docrafts.co.uk


Tuesday, September 15, 2009

Keep the comments coming ladies! It is inspiring! Only a few days left before I give away the awesome Christmas Punch Stamps!!
PS earn even more chances by ordering from my SU website or purchasing one of my class-kits-to-go. I promise, you wont be disappointed. Place an order here or on my SU website and you will get 5 extra entries for the Blog Candy.....
PS what do you all think of the new blog design?
Selecting The Right Scrapbooking & Rubber Stamping Cutters
Your scrapbooking, rubber stamping, and cardmaking projects will look perfect when you use the proper cutting, trimming, and scoring tools. Understanding the differences between these tools helps to insure that you are using the right tool for the right job.
The most popular trimming and cutting tools are the guillotine table top trimmer, mini personal paper cutter, and the rotary trimmer. Paper punches, scoring blades, T-squares, and shape cutters are important to have on hand as well before starting your project.
The guillotine trimmer is the traditional paper trimmer you can find any office supply store. A long sharp blade (often curved) is hinged at the base and is lifted above the paper and down directly on top to make a straight cut. Please keep in mind that not all guillotine trimmers are made well. You’re going to need a solid, sturdy guillotine trimmer with tight fittings. Make sure the handle doesn’t flex at all or you will be consistently frustrated by crooked cuts. Another great feature is a detachable blade which can be sharpened or replaced.
Rubber stamping projects often require simple cuts to mattes and small pieces of stamped card stock. The personal trimmer is the perfect tool for the routine trimming and can fit inside your desk drawer. Small paper trimmers usually have safety features that make them especially suitable for trimming small items held by hand close to the blade. This allows you to crop small pieces of hand stamped card stock, trim tiny wallet photos, and matte stocks. Personal paper trimmers are not suitable for long straight cuts because they are usually made of lightweight plastic.
Rotary trimmers are the newest of the bunch and have become favorites for many different reasons. For rubber stamping and scrapbooking projects, the rotary trimmer excels because you can purchase many different styles of artistic cutting blades. Need to make a straight, curvy edge? Want to perforate a homemade envelope? With the rotary trimmer, this is no problem. You’ll want to find a model that has easily interchangeable blades. In addition to table top trimmers, many rotary trimmer systems also come with handheld trimmers that use interchangeable blades and allow you to cut shapes like circles and flowers. Handheld rotary trimmers use a self-healing cutting mat. You’ll find many different sizes in the craft section of your local department store or fabric store. The unique cutting surface is specifically designed to allow you to cut any shape with your rotary cutter and can be used many times without showing wear.
Shape cutting tools have come a long way and are quickly become a favorite tool for scrapbooking enthusiasts. Because they allow you to cut many different shape styles with one inexpensive tool, they are much more inexpensive than individual paper punches. One thing to look for when purchasing a shape cutter is the quality of the pivoting head. You should be able to cut in one smooth motion without the blade catching on any part of the template.
Paper punches are the easiest way to make sure your shape is perfectly cut every time. Your paper punches should be easy to use and have no trouble cutting through card stocks. If your paper punch becomes difficult to use, it could be a result of glues or adhesives getting into the die mechanism. Usually a spray of a silicone lubricant will solve this problem.
T-squares and the scoring blades are tools that can be very helpful while stamping and scrapbooking. Durable T-squares that will last many years can be purchased at your local hardware store. Cheaper styles can be purchased at a craft store. Buy a quality T-square that has a tooled edge for making perfectly straight lines and cuts. You will be able to line up corners and make perfect mattes. Scoring blades are used to make straight tears and folds along the corner edges of handmade greeting cards. Designer scoring blades allow you make decorative tears on scrapbooking paper and card stock.
You should get at least one version of each of these cutting tools to enjoy all of the benefits. Having the right trimming and cutting tools saves time and makes your finished paper craft project look much better. Buying high quality tools that will last for many years will insure inexpensive overall costs and usually a much better look. Give them a try today and see how they improve your work!
Kathy Williams loves working in Rubber Stamping Fun, her online stamping store, and enjoys writing informative articles about rubber stamps and scrapbooking.
Author: Kathy WilliamsArticle Source: EzineArticles.com
Cricut Flower Bouquet
Custom Crops shows us how to make a fantastic bouquet with the cricut, check it out!
Today's Featured Project
Twick or Tweet Favor Box

Twick or Tweet? "Tweet" is our answer, without a doubt! Our cute little bird (incognito, of course) is ready to delight your friends and neighbors with his bucket of treats this Halloween. For recipe or purchase information, just click on the project!

Monday, September 14, 2009
Poker Challenge: Daily Inspiration
I came across this blog today and am totally inspired!!!! Daily Inspiration provides different daily challenges to help you find your scrapbooking mojo!!! LOVE IT!!!! Take a look at today's challenge....
Draw five cards from a deck and use the corresponding items from this list to make your LO or project!
more red than black - more patterns than cardstock
more black than red - more cardstock than patterns
2 - buttons
3 - ribbon
4 - ric rac
5 - fiber
6 - glitter
7 - chipboard
8 - brads
9 - eyelets
10 - a punch of some sort
J - gems
Q - hearts
K - flourishes
A - stamps
Today's Featured Project

|
| |||||||||||||||||||||||||||||||||||||||||||||||||
| | ||||||||||||||||||||||||||||||||||||||||||||||||||
Rubber Stamping with chalk
Trying to bring you guys more videos to watch, found this one on you tube... check it out!
Free SVG: Black Cat

Sunday, September 13, 2009
My new Blog design is almost done!!
Oh, I saw Michelle Laycock's draft of my new blog design, I am super stoked!!! I cant wait for you all to see it!!!!!

Scrapbook Embellishments made easy
Here is a little video about using odds and ends in your scrapbooking. It really makes your scrapbooks one of a kind and also helps the environment by recycling and creating a smaller carbon footprint. Watch as Stephanie Ovak talks about using items from your junk drawer in your scrapbook pages
Home design trend focuses on what women want: Scrapbook rooms
Its official!!! Now even home builders are considering our need for a scrapbook room when designing new homes!!!! We are getting closer and closer to taking over the world ladies!!
Home builders have long realized women were their target customers. Even so, they rarely asked women what they really wanted. Entertaining: There are 10 different Woman-Centric floor plans, which shift according to a buyer’s entertaining needs. So someone who does a lot of casual entertaining might prefer an informal open living space that flows into a large kitchen, where guests always tend to gravitate. Storing: These designs emphasize efficient storage with generous kitchen pantries, oversized bedroom closets and a rear foyer storage known as the “drop zone.” The drop zone consists of lockers, cubbies and counter space for everything from laptops to kids’ hockey gear. De-stressing: Woman-Centric designs tend to offer amenities such as privately located master suites, walk-in showers or master bedroom “retreats.” “When women get home from work, they often start their second job,” Leslie says. “Our job is to take away that stress.” Flexible living includes areas that can be adapted to each family’s unique needs. That may mean turning a third bedroom into a scrapbooking room or planning rooms that serve as both an office and guest bedroom.
Home builders have long realized women were their target customers. Even so, they rarely asked women what they really wanted.
By: Tammy Swift, INFORUM
And so, for decades, homes were built with tiny closets, cramped foyers and small, isolated kitchens.
But all that’s changing. One local builder, Heritage Homes, has adopted a patented design concept known as “Woman-Centric Design,” which offers floor plans and marketing techniques based on five years of women-oriented market research and focus groups.
“It taught us a whole new perspective in building and selling homes,” says Tyrone Leslie, president and CEO of Heritage Homes. “It’s our duty as a builder to understand our customers. And shame on us for not doing that sooner.”
Woman-Centric Design is the brainchild of a Nebraska-based company, Design Basics Inc., which is – fittingly enough – headed by a woman.
Design Basics’ female-centered marketing is based on one key statistic: that women directly purchase or control influence in the purchase of 91 percent of all homes, Leslie says.
An example of Heritage’s Woman-Centric design can be seen at this fall’s Parade of Homes. It’s located at 1924 7th St. E., Charleswood, West Fargo.
This home stands in sharp contrast to many older homes and old-school design approaches. Not so long ago, builders expected women and their families to adapt themselves to a limited choice of floor plans, rather than letting women determine how the house could fit their needs, Leslie says.
But Terry Becker says women have always been a vital part of the home-building process. As president-elect of the Home Builders Association of Fargo-Moorhead and a custom builder, Becker says women influenced home design throughout his 30-plus years in the business; they just have many more design options today than they did a few decades ago.
Becker says certain building trends – increased storage, more luxurious master bedrooms and expanded foyers/mudrooms – have all been influenced by the female customer. While male customers may have strong input on specific aspects of the house, such as the theater room or the shower, the majority of design decisions are made by women, he says.
Design considers storage, flexibility
Heritage Home’s Woman-Centric design is a 4,296-square-foot rambler with gourmet kitchen, maple cabinetry, granite countertops, five bedrooms and three baths. It’s listed in the $524,900 price range.
But it’s also built to follow four key concepts of Woman-Centric design:
These perks sound tempting, but they also beg the question: During tougher economic times, will people pay a little more for extras?
Leslie believes they will. “They’re willing to pay if they understand it and know they’re going to use it.”
And how do men think about all this female-centered marketing? Do they feel marginalized?
“At the end of the day, what they really care is that their wife is happy,” Leslie says.
Rubber Stamping Techniques
RUBBER STAMPING TECHNIQUES
Ever wonder where some of these stamping techniques come from? Ever wonder how someone did that great technique? Here are a few resources to help you find new techniques.... I hope you find atleast one source or technique that is new to you!
Ever wonder where some of these stamping techniques come from? Ever wonder how someone did that great technique? Here are a few resources to help you find new techniques.... I hope you find atleast one source or technique that is new to you!
Art Glitter: outlines techniques and information on AIG Glitter and Transparencies
Stamp Mall: instructions for Aluminum Foil Stamping
The Stampin Place: using a rubber brayer to attain creative background results
The Stamping Studio: tutorial and instructions to make stamped and beaded pens
Stampin Addicts: how to create textured and dimensional stamped backgrounds
Rubber Road Adventures: over-stamped bleached background technique
Stampin Buds: tips for using blending pens
Michael Shannon: offers a tutorial on simple and creative book making
Brass-Stencils: embossing tips and information on using brass stencils
Scrapbookie: how to make a scrapbook using brown paper bags
Clearly Rubber Stamping: using rubber stamps and colored ink on candles
After Midnight Stamps: CD Pin instructions and tutorial
Craftbits: simple tutorial on making CD Sun Catchers
Altered Book: how to make a mini coin envelope tag book
Deb’s Stampin Spot: tips and techniques for using Crystal Lacquer
Swirlydoos: using Alcohol Inks to customize your stamped projects
DIY Network: Tutorial for making your own button and cork stamps
Scrapbook Advice: discusses types, uses, and applications of decorative pens
The Enchanted Gallery: creative Domino Art ideas and techniques
Stampin Up: illustration of Dry Embossing technique
Moments of Your Heart: using embossing powder to achieve color
Tale of Hare: embossing powder tips, tricks and recipes
Instructables: complete instructions for making Envelope Books
By Donovan: instructions and templates to make your own envelopes
Expression Art: how to artfully stamp on faux tiles
Joggles: easy tutorial outlining fabric stamping technique
Blockhead Stamps: instructions for glass marbling with Micro Marbles
US Artquest: instructions for making glass ornaments with stamps and pigments
Cloud 9 Tips & Techniques: tips and techniques for using Glaze Pens
Eureka Stamps: using stamps to embellish with gold leaf flakes
Scottish Border Stamping: explains the use of the Grid Technique to create stamping patterns
Art Without Anxiety: explains the different types of ink and inkpads used for various stamping techniques
Iris Folding: lesson plan and project tutorial on the art of Iris Folding
D.Harm Trading: general information and application ideas for Lumiere Paints
Learn 2 Stamp: the basics of the Medallion stamping technique used to create dimension
Atlas Quest: provides direction on mounting your own stamps
Michaels: instructions for making an acrylic stamped notepad holder
Fun Science: illustrates how to make your own paper at home using recycled paper products
Ecstasy Crafts: explains the general technique of Paper Trapunto design
Fabric and Art: tips and techniques for using Pearl Ex Powdered Pigments
Sara Jane Studio: illustration of the use of the Polished Stone Technique for making textured backgrounds
Makers Gallery: simple illustrated instructions on how to make Pop Up Cards
Craft Town Hobby Land: details the use of Rainbow Sponges and provides project ideas
Scratchboard: tutorial on Scratch Board basics
Scrapbook.com: Provides thousands of themed and inspirational scrapbook layouts
Split Coast Stampers: using the Shaving Cream Technique to create dimensional backgrounds
Creative Mode: illustration of the Slide Stamping technique
Close to My Heart: how to use a candle to create the Soot Stamping effect
Sparkle N Sprinkle: general techniques for spotlight stamping for highlighting effects
House of Stir Fry: provides templates to create your own stamped playing cards
Soap Impressions: instructions for stamping on soap
Coxes Art & Stamping: provides a comprehensive glossary of stamping terms, including abbreviations and techniques
Trystan Craft: instructions for stamping on velvet
Nut N Honey: provides solutions for stamp storage and display
Trish Bee: mixing and stamping techniques for Walnut Ink
Stampington & Company: watercolor techniques for stamped images
Digital Scrapbooking Video Tutorial
I stumbled across this great video tonight. If you are new to digital scrapbooking, this is a great little video to check out. If you want to use Stampin Up's new My digital studio elements without purchasing the entire software package, you can use software you already own, like photoshop.
MDS- My digital studio will be available to customers on 1 October... If you have $400 workshop during the month, you can get MDS at half price! That is an awesome deal!!! October dates are filling up fast, so hurry and get your workshop booked today!
MDS- My digital studio will be available to customers on 1 October... If you have $400 workshop during the month, you can get MDS at half price! That is an awesome deal!!! October dates are filling up fast, so hurry and get your workshop booked today!
Saturday, September 12, 2009
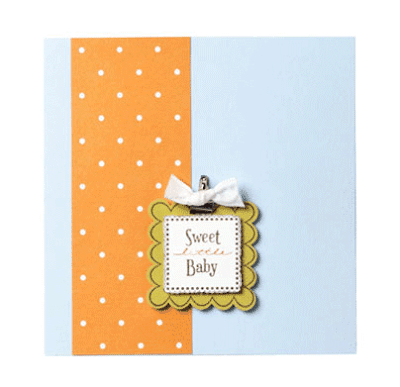

Christmas Punch Give Away
I am really surprised at the turnout on day one of my blog candy and the lack of response on day 2....... Interesting how many people turn out for blog candy advertisements and dont actually come back after subscribing....... So, you should increase your odds, by checking out all the days of the giveaway and leaving comments... Today is Day 4 of the giveaway............ Be sure to go back to see the other days!
Day One
Day Two
Day Three
In the meantime here are a few more samples of cards made with the Christmas Punch set that I am giving away next weekend.....

This first card was inspired by SCS: Vera, I used Christmas Punch of course, Real Red, Whisper White and Garden Green. I also used a 1 1/4" square punch, the Curly label punch and the scalloped square....


Finally, I used some Garden Green and Real red with some Sleigh Bells Ribbon and Christmas Punch. This one, also inspired by another stamper: BKeenan
Today's task is simple, just comment on any of my posts this week, you get one entry for each individual post commented on.... only one per post.
Free SVG: Flourish
 Wanda has really out done herself with this intricate design, isnt it just lovely?
How To Condition Your Stamps
The Operators at one of my favorite sites, Stamping 411, came up with this fabulous tutorial to show you how to condition your stamps. The reason you want to condition your stamp is to get rid of that Hazy look they have when they come from the factory.
This is noticeable when you ink your stamp for the first time. When you’ve transferred the image to cardstock you get an image that looks something like the one on the left of this picture:

Yep! It’s especially noticeable with SOLID image stamps like this one where there are no lines to color in after stamping. But sometimes even your LINE ART images and GREETINGS need conditioning as well to make sure you are getting the best image transfer possible. We here at Stamping 411 know that you always want your images to look great from the first time you stamp them – us too! And the image on the right of the above picture shows you what a well conditioned, well inked stamp on cardstock looks like.
Now, there are several ways to Condition your stamps. The one I use almost exclusively is to lightly sand the stamp surface with my Sanding Block. I hold the stamp in one hand like this:
 Then, I rub my Sanding Block back and forth a few times in one direction:
 And then I turn the stamp a half turn and sand back and forth a few times in the opposite direction.

Once this is done, I spray some Stampin’ Mist on my Stampin’ Scrub and clean the stamp like this:
 making it ready to use. It’s really that easy folks!
Two other methods that stampers use are equally easy.
One is to use your Staz-On Cleaner and simply clean off the stamp, clearing away the residue. Here is an example:

You can also use a pencil eraser and rub it lightly across the stamp surface, like this example:
 Whatever method you choose is really up to your personal preference, but the main thing is to “Just Do It!”
Be sure to clean your stamp before use with Stampin' Mist and the Stampin' Scrub when using either of these examples as well.
One other thing to consider when stamping with a conditioned SOLID image stamp is to make sure it has plenty of ink on it.
One other thing to consider when stamping with a conditioned SOLID image stamp is to make sure it has plenty of ink on it.
The way I do this is to use the “Twist and Tap” method. I first twist the stamp on the surface of the ink pad – dye or Classic inks only for this, Craft or pigment inks are different – about 3 to four times. Then I tap it a couple of times on the ink pad to evenly distribute the ink across the stamp surface. This results in a crisp, clean image almost every time.
Happy Birthday Operation Write Home!!

Operation Write Home, formerly know as Cards for Heroes is a fabulous organization that makes handmade cards for Military members to send home to their loved ones....
As of today 194,206 cards have been sent to deployed heroes! The response from the troops is great, they love sending these hand-crafted cards home.
Operation Write Home is a group of crafters from across America (and beyond!) who have a heart for our nation's armed service members. We make handmade cards and send them to deployed warriors so they can keep in touch with their loved ones at home! We serve all branches of the military in all deployed locations, including those stationed aboard ships.
The project began in 2007 with just a few cards sent by friends on a message board; eventually cardsforheroes.org started, and in September 2009, we became Operation Write Home - to better focus on what we're all about: helping heroes keep in touch with home!
Our crafters range in age, location, and level of skill - but all have a desire to help those who serve us. Cards are made by individuals, groups, schools, scouts, and sent to our volunteer shippers in quantities both small and large! Shipping donations of any size are appreciated - from $1 to any amount - and can be included with card donations to any shipper, or mailed separately, or via Paypal.
If you are interested in contributing, here are some dates to keep in mind.
CARD DEADLINES
- Halloween: Sept 20
- Thanksgiving:Oct 5
- Christmas:Nov 1
- Hannukkah:Nov 1
- All other cards: anytime
Free school SVGs
 Aren't these files terrific? These would be great for decorating those elementary school binders or maybe even getting started on some Holiday Gifts for Teacher....
Sam and Hailey create so many wonderful files for purchase, be sure to stop by their store and see what they have come up with!!!
Christmas Punch Blog Candy - Task 3

In this post, I wanted to show you just how versatile this stamp set is, look at all these fantastic projects I found, using this hostess set. Arent these projects inspirational? Today, to enter, just tell me which project you like best......... and what would you do with this set, if you win it?


If you missed the first two ways to enter, you can find them here:
Day One
Day Two


I found all the above samples on the internet, they are from fellow demos and SU customers.