Welcome to Scrappin Outloud

Thanks for dropping by! Take a look around and stay awhile. See that little purple box on your left, it contains a summary of recent posts, further down, you will see a box of shared items, these are things I find around the web and want to share with you. Further down on the left you can add a link to your own blog for others to see. I love comments, so feel free to leave some love and thanks for stopping by.

Tuesday, January 26, 2010

Tutorial Tuesday: Homemade Box

Tammy, over at she wears flowers  made this great homemade box
she got the idea from a similar box at Target and made hers with recycled materials... AWESOME!!! Check it out here


Tweet this
Share this on Facebook

Paperbag heart tutorial


Amanda made this fab decor out of a paperbag. You can find instructions here


Tweet this
Share this on Facebook

Tuesday Tutorials: Fabric Scrapbook

Check out this great looking scrapbook, made of fabric!
Melissa has even provided a picture tutorial here


Tweet this
Share this on Facebook

Cherry Hearts SVG Freebie


Tweet this
Share this on Facebook

More Paper flowers

Are you tired of these flower videos yet? I am so in love with all these fabulous flowers..... Have you seen some of the new flowers by Prima? I love them so much, but there is no way to afford all of them.... So why not create our own. Here is another video for you for these crumpled print flowers, the idea is certainly good for any patterned paper as well!


Tweet this
Share this on Facebook

Free Valentines Tree SVG

Still on the road, and cant test him out, so if you take him, let me know how it works for you!


Tweet this
Share this on Facebook

Free "Snail Mail" SVG

I found this great digital stamp at doodle Palace and turned him into an SVG


As you know, I am on the road and unable to try an cut him with the cricut, so if you download him, be sure to let me know if he works or not! Just click on him to download. Dont forget to stop by the doodle palace to download the original.


Tweet this
Share this on Facebook

Button Techniques

Came across this tutorial and thought it was perfect for a Tuesday tutorial. You can find the original post here
Supply-photo

Option 1: Stitching a button to your project. For this technique, you will need a piece of paper, a paper piercer, a button, and a needle threaded with your favorite embroidery floss or thread. Place the button on the paper in its final location and then use the paper piercer to poke holes through the holes of the button. Knot the thread of the button and then starting from the backside stitch the button to your paper. (Example: Large yellow button stitched to half circle on completed layout below.)
Button-step-1
Button-step-2
Button-step-3
Button-step-4

Option 2: Faux Button Tying. For this option you will need a button, thread, and a glue dot. Thread the twine or embroidery floss through one hole in the front of the button. Come up through the back of the second hole and tie a knot in the thread. Then tie a bow. Attach the button to the project with a glue dot. (Example: Yellow button tied to twine wrapped around pattern paper border in the completed layout below.)
Button-step-1a
Button-Step-2a
Option 2 (b) Faux Button Knotting. Follow the instructions for Option 2 but instead of tying the thread into a bow, just make a knot and trim off the excess with scissors. Again, mount the button on your project with a glue dot. (Example: Small green buttons found on distressed diamond die cut border on completed layout below.)
Button-step-1a
Button-step-2b
Option 3: Button Tied Through the Back. Repeat the steps found in this last two options, but this time thread the floss through both holes in the front. You can tie the thread/floss/twine to another item, such as a ribbon in this example. (Example: The yellow button tied to the brown ribbon in the completed layout below.)
A Note: The Four-Hole Button. Thread the floss through both holes on the front, and then bring each thread through the backside of the two remaining holes. You can knot or tie the thread into a bow and then adhere it to your project with a glue dot.


Tweet this
Share this on Facebook

Ooops, I did it again.....

I played with your heart.... got lost in the game.... okay, I know You probably have little faith in me anymore cuz I said no more flower tutorials today and here I am yet again with yet another flower tutorial, but really, can you ever have too many flower tutorials? Really? This time we are looking at altered, pre-made flowers:


Shermaine shows us how she altered these flowers from two different companies and two different colors to come up with this fabo-coordinating flowered layout!!! Check it out here


Tweet this
Share this on Facebook

Zipper Flowers - another tutorial

Okay, I said no more flower tutorial today, but I just found this one and it is tutorial Tuesday, so, why not? Check these out....

A zipper flower???  I have visions of zipper flowers on male layouts and cards, maybe? What do you think? Well, if they aren't your cup of tea, I certainly understand, but, I have three sons and I am always looking for ways to make male layouts more interesting!! If you wanna know more, find the tutorial here


Tweet this
Share this on Facebook

Singed Chiffon Flowers


Ok, Ok, I promise this is the last flower tutorial for today at least, but these are so pretty, I just couldnt help myself... I am on the road this week, I cannot wait to get home and try out some of these!!!
You can find the tutorial here


Tweet this
Share this on Facebook

Using Flowers on your layouts and some Free SVGs

Since I found all these great flower tutorials for today, today is a great day to share this article from Rebecca Ludens at about.com, There is a great gallery full of ways to create your own flowers and use them on your layouts. In the meantime, I tried to make a few quick cut files (using Rebeccas patterns)for you  (I am on the road, so I am unable to try them out, if you try them, please post a comment, so I know they work., click on the screen shot to download the files.


Tweet this
Share this on Facebook

Tutorial Tuesday: Awesome Paper Flowers

 Reduced: 85% of original size [ 800 x 533 ] - Click to view full image

I found a step by step pictorial on how to make these so everyone can see the steps and items needed to make them. (thank-you to the blogsite Imagine, Create, Inspire for this bloom idea)

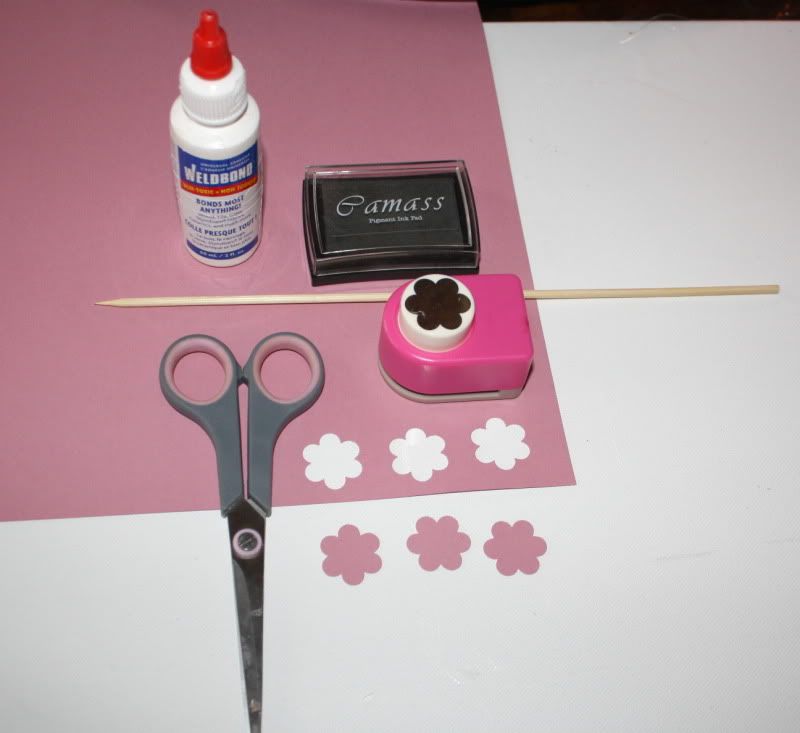
TO MAKE THESE ROSES YOU WILL NEED:

~ A 6 petal punch (any size, the size of your rose will vary by the size of the punch you use, ....for this rose I used a punch that has a punched image about the size of a quarter)

~ Scissors

~ Glue

~ Ink

~ Cardstock

~ toothpick or wooden skewer

 Reduced: 85% of original size [ 800 x 733 ] - Click to view full image


Step 1

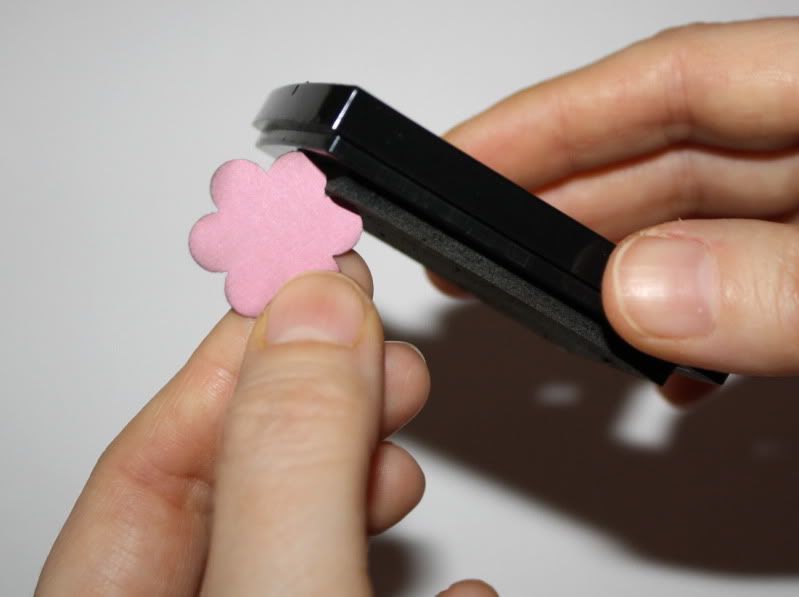
Punch 3 six petal blooms and ink the edges with a complimentary ink.....

 Reduced: 85% of original size [ 799 x 597 ] - Click to view full image


Step 2

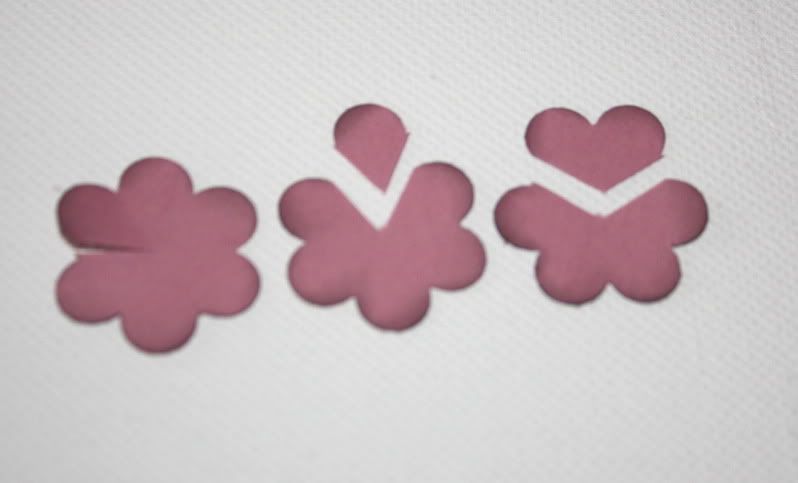
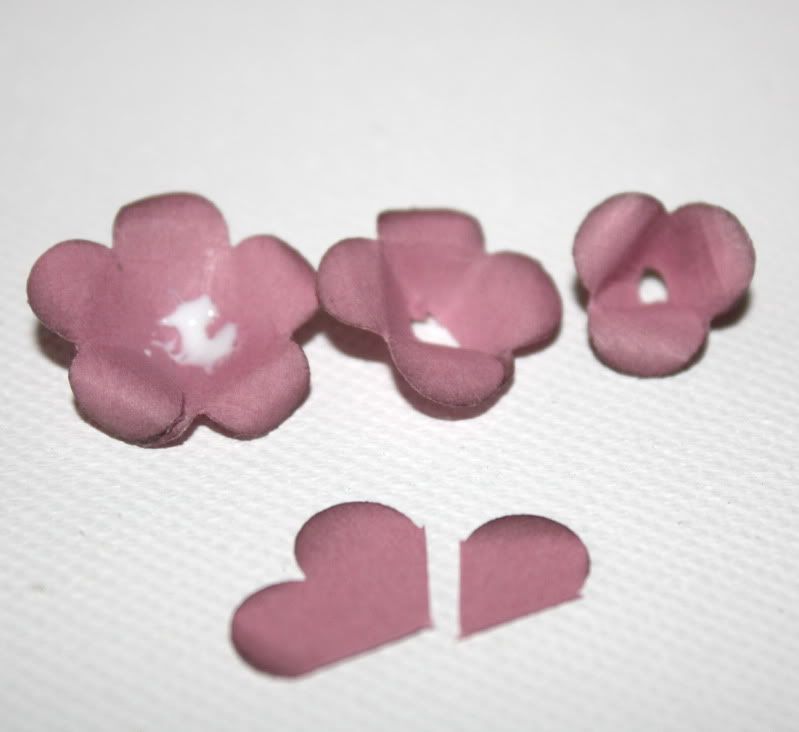
Cut each of the punched blooms as shown below. You will put a slit in one of the blooms, cut 2 petals out of the second and 1 petal out of the third. Giving you 5 pieces to work with......

 Reduced: 85% of original size [ 798 x 483 ] - Click to view full image


Step 3

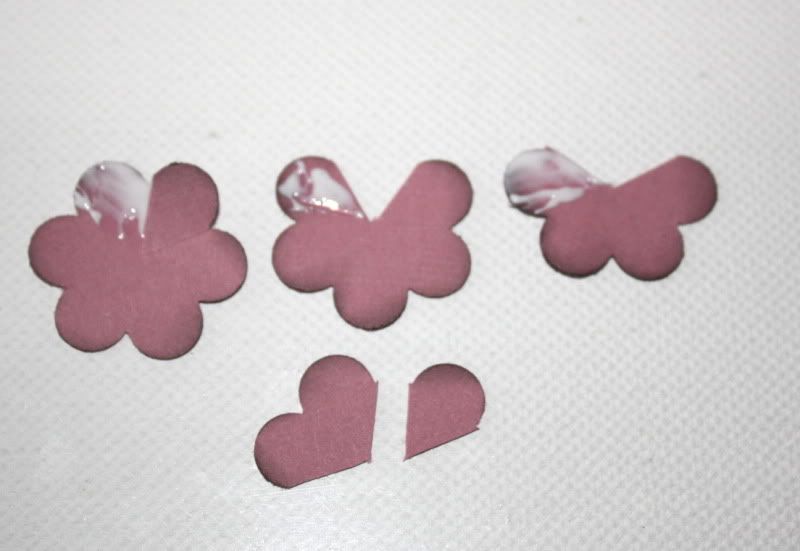
Glue the petals of each of the larger pieces as shown below. Bring right petal over glued petal to make 3 cones (One cone will have 5 petals, one will have 4 petals and the other 3 petals)....

 Reduced: 85% of original size [ 800 x 551 ] - Click to view full image


Step 4

Below is a picture of one of the glued flower cones. Using your toothpick or skewer curl each of the petals back.....
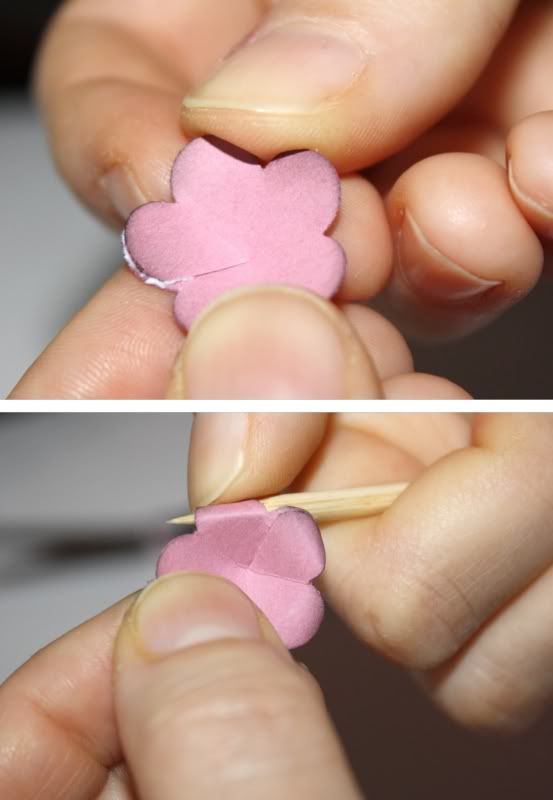


Step 5

Put some glue into the bottom of the largest cone. I like to snip the bottom point of the other 2 cones so that the middle layers don't sit too high in the center of the bloom. In the pic below you can see how the two smaller cones have the centers snipped out....

 Reduced: 85% of original size [ 799 x 732 ] - Click to view full image


Step 6

Layer the cones inside each other, glueing them in place....

 Reduced: 85% of original size [ 799 x 671 ] - Click to view full image


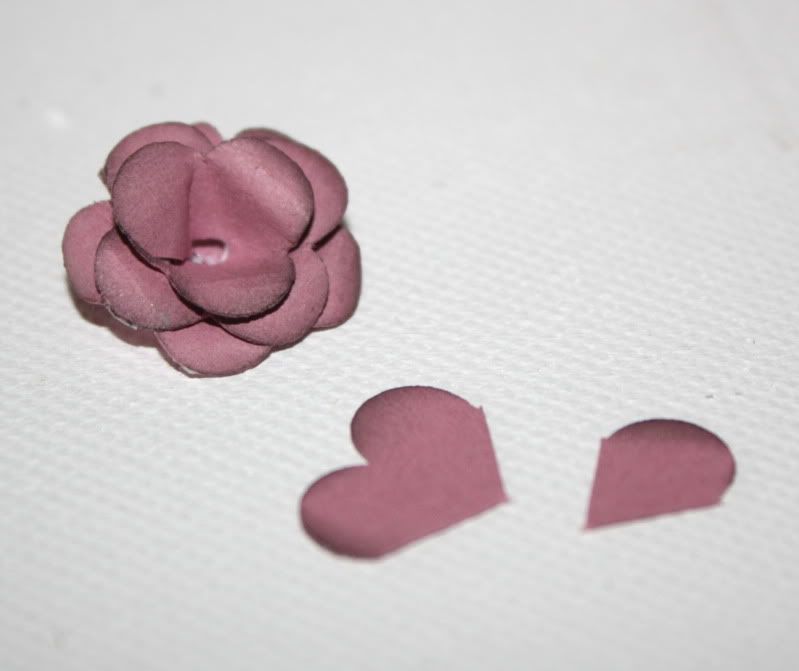
To make the centers with the left over bits of petals follow these steps.....

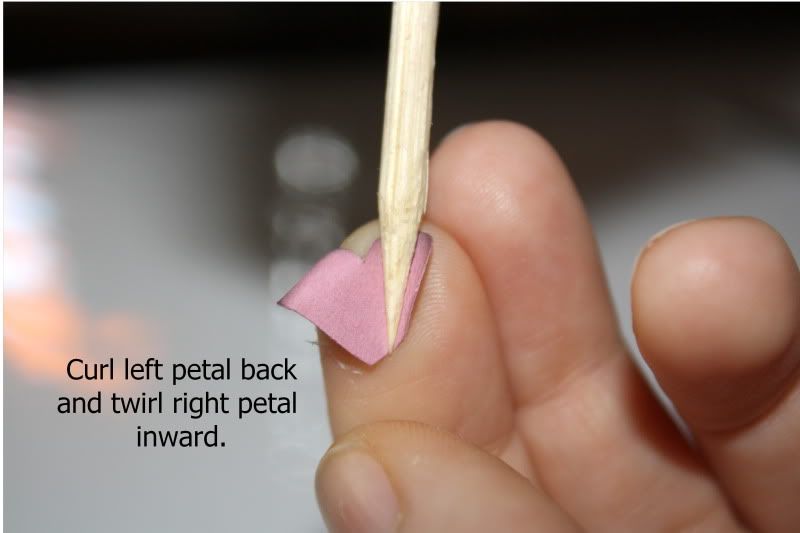
For the 2 petal bloom, curl the left petal back, and curl the right side inward. Wrap the curled petal around the inward curled petal (see photo below this one for further photo help)
 Reduced: 85% of original size [ 800 x 533 ] - Click to view full image


 Reduced: 86% of original size [ 794 x 799 ] - Click to view full image


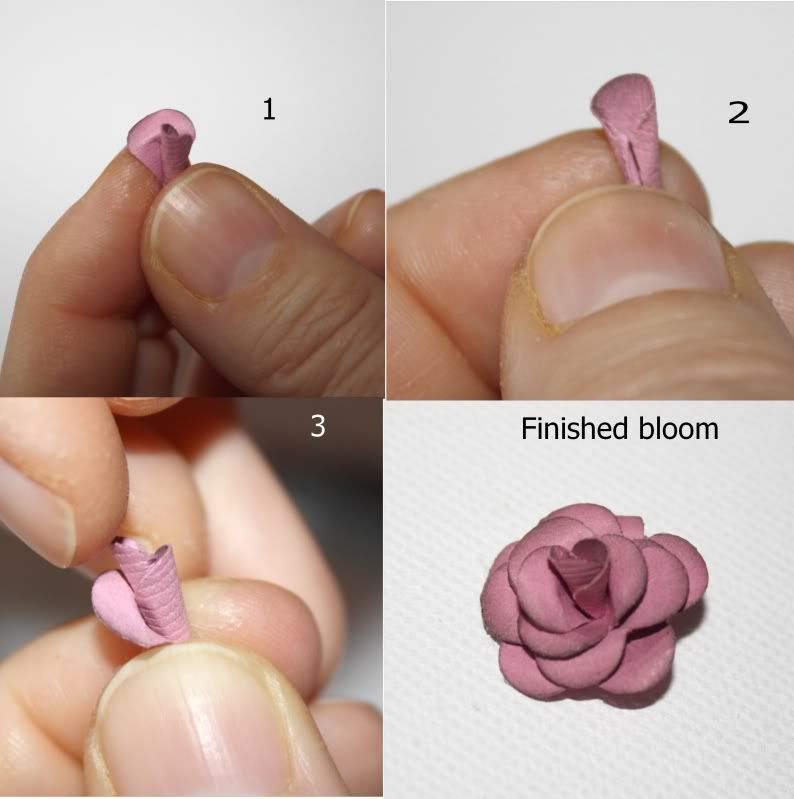
For the single petal piece just curl both edges inward, pop a little glue at the bottom and stick it inside the swirl of the 2 petal piece. I snip a tiny bit off the bottom of this piece, add glue and put in the center of the bloom. Picture #4 is of the finished bloom.
Cricut Top 40