Welcome to Scrappin Outloud

Thanks for dropping by! Take a look around and stay awhile. See that little purple box on your left, it contains a summary of recent posts, further down, you will see a box of shared items, these are things I find around the web and want to share with you. Further down on the left you can add a link to your own blog for others to see. I love comments, so feel free to leave some love and thanks for stopping by.

Sunday, May 31, 2009

Going Dot Com Birthday Bash


Tip Junkie is one of my favorite sites, I love getting their emails every day full of fantastic information. Well, for their Birthday this month, they are having some spectacular birthday give aways and you can be a part of it, check out some of the stuff, there are 50 PRIZES!!

The Going Dot Com Birthday Bash will be hosted like a giveaway carnival with 10 prizes given out each day. Here are the amazing Mom-preneurs who are participating:

Monday, June 15th:

1. Eclisse Creazioni's
2. Baby Dipper
3. Bibs & Cribs
4. Bead Blossom Design
5. Heritage Makers
6. Charming Gifts
7. Angi Stampin' Up: that'e me ;)
8. Prarie Mama
9. La Bella Jewels
10. Mazer Designs
11. The Celebration Shoppe

Tuesday, June 16th:

1. Baby Chacha
2. Little Darlin Designs
3. Chubby Baby
4. Cherry Blossoms Baby
5. Angel Face Designs
6. The Vintage Pearl
7. Elegant Celebrations
8. Pixisette
9. Every Little Detail
10. Semiprecious

Wednesday, June 17th:

1. Chic Covers
2. L Herbert Designs
3. Chelsea Vantol
4. Tickatoo
5. Imagine Childhood
6. Me Oh My Paper Boutique
7. Staker Sensations
8. Buzz About Baby
9. Venezie Bags
10. Petit

Thursday, June 18th:

1. Nikki Michele
2. Whitney Caroline Designs
3. Sweet Baby Cake
4. Inspired by Jenna
6. Mine Own Book
7. Fifi Flowers
8. Daisy Craft
9. Doodle Design Shop
10. Sugar Sweet Baby
11. Sweet Funky Vintage

Friday, June 19th:

1. Scrappy Design
2. Polka Dot Paisleys
3. Inspire Your Walls
4. AJ's Bowtique
5. Simply Shell
6. Sweet Mady's
7. Studio JK
8. Shabby Straps
9. Dream Custom Artwork
10. The Baby's Bundle

Making sense of Cricut terminology

Are you new to the crafting world or new to the world of Cricut anyway, check out My cricut page, you can find information on cricut, Sure Cuts a lot, Cricut Design studio, free cut files, links to some great cut file sites and even a quiz to see which software is right for you.

The New Late Night Stamper Group

LNStampers group Sherrill Graff has opened two new SU LNStampers groups. . I have listed below the differences in both groups. You may join one or both of these new groups.
New Stampin' Up LNS group VS Demo Only business mail

New Stampin' Up LNS group - StampinUpLNStampers http://groups. yahoo.com/ group/StampinUpL NStampers/
This group will have stamping 101 through advanced techniques
This group will have the design team and challenges
This group will have the inspirational stories and chit chat
This group will focus on helping members become better stampers
and building relationships
This group will help nurture members who wish to become demonstrators someday

VS

Demo Only business mail - LNSDemoOnly The Demo only group will be strictly business
A demo must prove active status to join that group.
The Demo only group will focus on helping members become better business owners

A fantastic Punch storage Unit

One of my all time favorite crafters is Patter Cross, she is amazing, I love all her tips and art work! Every Friday, she posts an organizational post, this week, she featured this fantastic find! Sue Nagel, from Stampin Things has created this gorgeous storage unit for your punchies.

And here is what Sue says about her new organizer:

You can custom fit the 'Punches and More' to your needs. This NEW organizer will hold every size punch (small, medium and large). This organizer has a tray at the top for additional storage, a lazy susan base, and spins for easy use. The Punches and More Organizer will hold up to:

**30 Large Punches (or) 30 Medium Punches (or) a combination of both
**24 Large or Medium Punches with 22 Small Punches
**Additional storage on top tray for hand punches, other manufacturer's punches, and more!

Notice how she has all of her Creative Memories punches stacked on end to give her even more storage space on top! And look at the little bucket on top containing all of her small hand-held punches. Tons of room! The dimensions of this unit are: 18" high, 14" wide, and 12 1/2" deep, and it is stackable as are her other units!

Now for the BIG news!
Sue is very generously giving this unit away to ONE of my AMAZING subscribers!!!!! Yes, that means YOU could receive this awesome unit! What do you need to do to possibly win this unit? You must create a card, tag, layout, or altered item using PUNCHES (not die cuts)!! It must be a NEW creation, and you must post it to an online gallery or blog with a link to this contest. Your gallery post or blog post MUST contain a list of the punch or punches you used. You then need to come back to this post and leave a link to your creation by Thursday, June 4th, at 11:59 p.m. Central Time! One lucky winner will be announced next Friday!!

Sue is also offering a 10% off SALE this weekend ONLY (Fri., Sat., Sun.), not including shipping, for my subscribers! First, go to her site, Stampin Things, and look at ALL of her amazing units! Find what you would like, then click on the Place An Order tab on the left. You can either e-mail Sue your order or call her (651...). In your e-mail or on your phone call, you MUST tell her you saw the sale on my site and give her this coupon code: PATTERSITE

Deeply discounted Copic Markers


I found this information over at Obsessed with scrapbooking!
Have you got a Sam's Club membership? Did you know that they sell a VAST number of scrapbooking products online for home delivery? If you don't have a membership, Sams Club is currently running a special offer to join for $15 just for the summer.

Anyway, looking through the over 40 pages of items, I was excited to see great Copic marker pricing!

Check this out:

Copic Ciao Markers - set of 36 for $106.68 (including shipping) with three different color set options. That's a wee bit less than $3.00 per marker.

Sketch Copic Markers - set of 36 basic colors are $156.88 (including shipping) working out to be a bit over $4 per marker.

Click HERE to see the copic marker selection at Sams!

They also have nestabilities, the ATG gun and refills (Scotch brand Gold) and all kinds of other goodies!

Click HERE to see all their offerings!

Also, I have big news coming up early this week with regards to new Cricut cartridges so stay tuned!

Stampin Up's Decor Stencils

Saturday, May 30, 2009

How To Read A Ruler

Check out another golden tip from Stamping 411's Lee Conrey, a Stamping 411 designer from Florida.

We know that "how to read a ruler" may be not where all our readers are coming from, but what better place to start than at the very beginning! Have a friend who's new to stamping?? You can refer them here and the articles within, will help them get started!

Lee writes "Understanding all of those little marks on the ruler. A standard tape measure (or ruler) in the United States is divided up into feet and inches. Each foot is divided into 12 inches. The problem starts with the subdivision of the inches. In each inch there are a number of lines of different length. The longer the length of these lines, the larger the unit of measurement.

For example. 1. The longest line in the inch is in the middle. This is the half-inch mark and there is only one. 2. The next shortest line is the 1/4" (one quarter of an inch) inch mark and there are only two of these. 3. The third shortest line is the 1/8" (one eighth of an inch) mark and there are four of these. 4. The fourth shortest is the 1/16" (one sixteenth of an inch) mark and there are eight of these. 5. Some rulers will go a step further, down to 1/32" but this is often more precise that most woodworking cuts need to be.

On the typical ruler the basic (smallest) unit of measurement is 1/16". If you count the distance between two inch marks (one inch) you will find sixteen lines. This is because an inch is 16/16th of an inch long. Because we like to express fractional numbers in the largest unit possible we call it one inch. So it follows that if you have 8 lines, or 8/16" you have a half-inch or ½". And likewise, if you have 4 little lines, or 4/16" you have a quarter inch and so on.

At first it can be a little cumbersome to count these lines but over time you will learn to recognize the lengths and the different units of measurements they represent. This often starts with the ½" mark and progresses down the line. Over time a measurements like 59-3/8" can be located quickly.

OTHER MEASUREMENTS You might have noticed that every 24" on the tape measure are marked with a contrasting black background and every 16" is marked with a red background. The marks are used by construction workers for spacing wood studs in a wall or joists in a floor/roof. 16" spacing is used most commonly for load bearing walls and 24" for non-load bearing walls. The small black diamonds represent a less common spacing scheme.


Your Stampin Window to the World!!

I found another great video on the Stampin 411 The New catalog isnt out yet and we dont know if these fantastic tools are gonna be in the new one, so, you have until the end of June, when the Mini catalog goes away to get yours. These are awesome in the Cricut. I will try and come back later this week and show you some of my cricut creations.

You can use these fantastic window sheets to brings a whole new look to your creations. Create windows, boxes, card fronts, accents and more!


Window Sheets


Die Cutting with Stampin Up!

Learn more about the new die cutting options from Stampin' Up! The Sizzix Big Shot for Stampin' Up! product line is a big deal! With the Big Shot you can cut over 50 different material types and duplicate creative and intricate designs quickly and easily. We've designed exclusive dies that coordinate with current Stampin' Up! product lines--such as our stamps and punches--as well as Sizzix dies that coordinate with the Stampin' Up! look and feel. Our product line will continue to expand, so check back to see what exciting new things are on the way. From the stampin 411 website


Save up to $30.00 NOW
Want to buy your Big Shot Now??? Order your Big Shot from me, before May 15, 2009 and save up to $30.00!

Order your Big Shot (includes standard cutting pad and multipurpose platform) Now for only $89.95 + S/H

Order your Big Shot Starter Kit (A $205.65 retail value) for only $175.95
- Big Shot
- Standard Cutting Pad
- Multi-purpose cutting form
- 2 Stampin Up Exclusive Bigz Dies (Scallop Envelope and Top Note (My Fav!)
- 1 Stampin Up Exclusive Decorative Strip (Billboard)
- 1 Stampin Up Exclusive 4 pack of sizzlits (Birds and Blooms)
- Decorative Strip Cutting Pads
- Extended Spacer Platform

Order your Big Shot Starter Kit with Doctor's bag for only $229.95 (Retail cost of bag $69.95)

The Big Shot works with ALL competitive dies, and the steel rule dies can cut through an impressive list of 50 different materials, including fabric, foil, and chipboard.

Wanna see what craft critique said about the Big Kick? Check it out here

25 Hours and counting!!!

ImageChef Custom Images

Stampin' Up!'s list of retiring stamp sets
will be released on June 1st. Which sets are going to be on the list? It's anyone's guess at this point - so, submit your guesses!!! What stamps do you think are going to retire, which ones do you wanna grab before they go???

Come Join Us!

Your are invited to share this link with your stampin friends http://groups. yahoo.com/ group/StampinUpL NStampers

This group will be "A place to share our Love for paper crafts using Stampin Up products. All stampers and scrapbookers welcome. We have a Design Team with weekly challenges, A Random Acts of Kindness team, A Stampin Up exclusive Swap team, a Blog Tour team, and many caring members who create for Cards for the Troops and Cards for the Kids staying at the Ronald McDonald House.
We believe in living the Statement of the Heart. We also follow The Golden rule (treating others like we wish to be treated) and we even share our inspirational and faith filled experiences on this group."

Please introduce yourself to the group once you join even if you think everyone already knows you here.
Please start and fill a photo album with your stampin up card samples and scrapbook ideas.
Art By: ________ and be sure to add a photo of yourself!

Friday, May 29, 2009

Heat Embossing Tutorial

I stumbled across this tutorial and had to include it on my blog, This was such an awesome technique to learn when I started scrapbooking 10 years ago and it is still one of my favorites.

Stamping on shrinky film

Check out this awesome tutorial for stamping on shrink film and making awesome home decor!!! I found this on CHF blog tutorials, posted by silvergirl
Basic Supplies
  • Stamps
  • Ink (Stazon permanent and Brilliance inks)
  • Plastic plates and water / wine glasses
  • Sanding paper
  • Shrink Film
  • Cardstock
  • Ribbon
  • Heat gun
  • Jump rings
Specific Supplies Used:
    Stamps:
    Summer Trees (The Kim Hughes Collection) by Cornish Heritage Farms
    Perfect Plaid Scrapblock® by Cornish Heritage Farms

    Ink:
    Red Pepper Adirondack dye inks by Ranger - for card
    Graphite Black Brilliance Black ink by Tsukineko
    Jet Black StazOn ink by Tsukineko

    Cardstock:
    Simply Smooth white cardstock by Cornish Heritage Farms
    Red and Green cardstocks by C'oredinations

    Other:
    White plastic plates and glasses (Dollar Store)
    Sandpaper and block (from Tim Holtz line)
    Shrink Film by Graphix
    Heat Tool
    Paper Piercing Tool by Making Memories (to hold shrink film)
    Crop-o-dile hole punch by We R Memory Keepers
    Oval Scallop punch by Marvy
    Copic Markers
    Jump Rings (Craft store- jewelry aisle)
Step One
Punch your desired shape from the Shrink film and lightly sand on one side. I like to punch out the shape first, because the ink has a long dry time and I don't want to smudge the ink.
Step Two
Stamp images on the sanded side of the Shrink film with Brilliance ink. This is a good choice if using Copic markers.

The sanding makes the surface more receptive to ink and less likely to "slide" during stamping.
Step Three
Using the Crop-o-dile, punch a hole in the top. Once the shrink film is heated, it's virtually impossible to add a hole for your findings.

Set aside to thoroughly dry. You can use your heat tool to aid in the drying step, but it needs to be done at a GREAT distance to avoid the shrinking from starting prematurely.
Step Four
Color your image. Colored Sharpie markers are a great alternative.

The ink should be completely dry before coloring in the images. And even though the Brilliance ink is a good choice for the shrink film / copic marker combination, you can and will rub off the lines if you aren't careful.
Step Five
You have two options:

1- Follow the manufacturer's directions and heat shrink the film in the oven according to the packaging instructions.

2- Using a heat safe surface and a great deal of care, you can use your heat tool to shrink the film. I recommend using a paper piercing tool to hold the film through the hole in the top and to have an acrylic block nearby to help flatten the image. Gently heat and watch as the film curls. When it unfolds, the film is at it's reduced size.
Step Six
Using Stazon ink, stamp around the edges of the plates.

NOTE: If you make an error, use a bit of Stazon cleaner on a cotton ball to clean and try again.
Step Seven
Align a few images on one block to create a center image for the plate. Stamp with Stazon ink.
Finished Project
Add an inexpensive basket, a blanket and cutlery from the Dollar Store to round out a quick and inexpensive picnic set.

Consider grouping together and giving as a gift.
Detail


Detail

Tie the charms onto your glasses with a bit of ribbon or twisted wire.

Detail

And if the set is for you... add a fun invite to entice a friend to join you for a fun afternoon at the park.


DISCLAIMER:
Please be careful when heating shrink film in a manner other than prescribed on the manufacturer's instructions. Remember safety first!!!

Sneak Peak at Next Month's class-in-a-flash

Want to see what my clubs will be working on next month? We will be making some adorable projects using the Good Friends Stamp Set!!! If you want to play along, be sure to sign up for my stamping club or you can order the kit-to-go option, which is just as good, but on your own schedule. Another option is the Party-to-go kit, you can purchase everything you need to hold this class in your own home, with your own friends. Keep looking out for this fantastic class coming to a blog near you!
Class in a Flash - Upcoming Class in a Flash Friendly Words Wheel Planner

Next month we are going to the birds. We are using the Good Friend stamp set to create a card set with an extraordinary container in the following colors: Tempting Turquoise, YoYo Yellow, Green Galore, Pumpkin Pie, Close to Cocoa, Whisper White. This project will be perfect for the coming season.

Want to make sure you get your own set of this fabulous stamp set? Hurry, the last chance list comes out in two days. I still don't know what's on the list, but those that are will surely go fast! So, reserve yours today!!


Thursday, May 28, 2009

The Retired Lists Are A Comin'

Monday, June 1st. Yikes, what a day that will be! All of the retired items for this catalog will be released. Retired stamps, retired accessories, everything! And, if you have been around for previous retired lists, you know that when the items are gone, they are gone! My suggestion - order ASAP so you do NOT miss out!!

I will be having a special for the month - for every order - get a gift certificate for 15% of your order (of retiring products). That gift certificate can be "spent" in July on things in the new catalog. Fun, fun!! For example, place a $50 order of retiring product, you will get a gift certificate for $7.50. Spend $200 on retiring products, get a $30 gift certificate.

The special goes for the whole month of June on ALL orders, but remember, the supplies of retired items is limited. Order soon for best selection!

Orders can be placed directly with me, online, or at a party. Whatever works!

Orders can include retiring and non-retiring products - only the retiring product totals will be figured in for the gift certificate amount. Gift certificate amounts will be subtracted from order total (just like cash) when they are used. Gift certificates must be used in July, during the new catalog premier!

To get your retired list, mailed directly to you as soon as I get, leave a comment on this post!

Add texture to your stamped image or paper with sanding

Check out this fantastic video by Jennifer McGuire, for Hero Arts. It looks like so much fun! I cant wait to give it a try!

Tuesday, May 26, 2009

June Workshop Specials

Dates: June 1-30, 2009

Promotion Details:

The Summer Fun Hostess Bonus Promotion has two parts:

  • Hostesses who hold a $250-$399.99 workshop will receive an additional $20 in hostess free merchandise dollars.
  • Hostesses who hold a $400 or more workshop will receive an additional $40 in hostess free merchandise dollars.

Email me today to book your June workshop!

Make your own glue dots

I found these fabo videos on you tube. Fellow SU demo, Linda makes her own glue dots, various ways and the second video will show you her results with various materials. Check it out!


It looks like, in a pinch, these fantastic glue dots will hold almost as well as the Stampin' Up! Glue dots. Have you tried to make your own glue? What do you think?

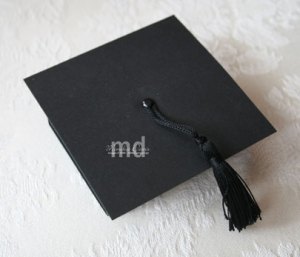
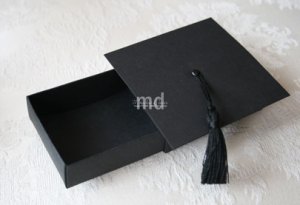
Graduation Cap Money Holder

Monika from Stamping together at Monika's place came up with a new idea over the weekend

She took the new Matchbox Die and used that to create a graduation cap grad-cap

Slide a check or some cash inside the drawer part. Add a tag. This was super quick.

grad-cap-open

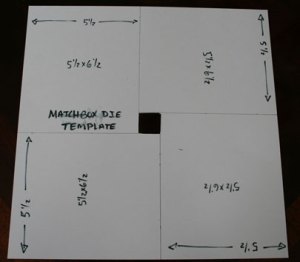
Use a piece of the cardboard backer from a package of Designer Series Paper – it is 12″ x 12″. Create a template by measuring 5-1/2″ from each side and drawing a line to the center. Once you have all four sides marked you end up with a small square in the middle – cut this out and throw it away. Now on your card stock lay down your template and trace out the small square – this will help you cut your card stock. Line up each side a 5-1/2″ and cut down to the square. Turn and repeat for all four sides – you end up with four pieces that are 5-1/2″ x 6-1/2″. Use two of these pieces on your Matchbox die to cut the base of the box and the cover plus the three tags. Here is a picture of the template:matchbox-die-template

The Matchbox Die is longer than 12″ so if you just cut a 6″ x 12″ piece to cover the whole thing – it won’t fit!

Isn't it adorable! I love al the versatility of sizzix dies, you can really do a lot with them once you add a little imagination! Don't have the new matchbox die from sizzix or Stampin Up yet? You can grab it right here! Hurry, the mini occassions catalog ends on June 30!


Monday, May 25, 2009

6 Ways to Water Color Class


Learn how to paint your textured Love Notes like a pro in my next class to go kit.
In this kit, you will get a blender pen, an aqua pen, six cards and envelopes and full-colored instructions to start water coloring like a pro!

You will learn six different water color techniques using, water color crayons; markers; pastels, water color pencils, a blender pen and an aqua pen.

Your class fee includes the blender pen and aqua pen. If you need to stock up on markers, reinkers, pastels, water color pencils or water color crayons, you can order them with this class for 10% off. (must be ordered at the same time as the class)

To purchase large quantities or whole color family sets, please email me for discount price.


Water Color Class
Enter your color selections


The Winner of the Stamp sets

The winners of the Free and the Brave stamp sets are:

Hopper: SuzAnn said...

Hope you have to make A LOT of cards :-)
May 24, 2009 8:32 PM

I have to check with CFH to see who the winning blogger is, I will get back to you with that one.

SuzAnn, please contact me so that I can order and send the stamps to you.

I have to make 90 cards this week to send to CFH, so I better go get busy!!!! Thanks for all of your support and comments this weekend!prize winner

The versatility of stamps

I am so amazed by this, this is all done with a set of stamps and ink, doesnt it look like a painting, stamping really is art. To check out more of Lisa's work or how she created this fabulous art, check her out here

Cards for Heroes

If you landed here by accident, click here to get back to the start of the CFH blog hop:


Posted by Picasa
I made these cards for the Cards for Heroes Blog hop in celebration of Memorial Day.

Their Mission: To support our nation’s armed forces by sending blank greeting cards to write home on, as well as cards of gratitude to encourage them.

The first card, I made with CHF's new set "We Remember" I just got it, I love it, isn't it fabulous?

The next two cards are made with SU's "Free and the Brave" set, another perfect set to use for military promotions, retirements, deployments, etc!

I am really excited to be a part of this great cause! What a fantastic way to spend Memorial Day Weekend, then honoring those who serve as well as creating cards for those who lose sleep waiting for their personal heroes to come home, both equally heroes in my book!


To my fellow service members, THANK YOU! To those who came before us, One thousand times THANK YOU! To those who love us, we couldn't do it without your love and support and To those who gave the ultimate sacrifice, so that we can sleep in peace, we are forever in your debt, this is for you!!!!!!

In Honor of Memorial Day, I am giving one lucky blogger this fantastic Stampin Up Set,
AND, if you sign up for my newsletter over Memorial Day weekend and leave a comment on this post, I will draw a lucky hopper's name to win this patriotic set as well!

Also, in honor of all my fellow service members, if you want to place an order for this set, for this weekend only, you can get a 15% discount, that's only $18.65 +S/H


*** I am working on my second go-around through the tour (I started a little to early this morning and missed so many great blogs!) I decided to make one card to donate to CFH this weekend, for every comment you guys leave me!!!


Happy Blogging and Remember:
Freedom Isn't Free!

To go to the next stop, Click Here:
Cricut Top 40