Welcome to Scrappin Outloud

Thanks for dropping by! Take a look around and stay awhile. See that little purple box on your left, it contains a summary of recent posts, further down, you will see a box of shared items, these are things I find around the web and want to share with you. Further down on the left you can add a link to your own blog for others to see. I love comments, so feel free to leave some love and thanks for stopping by.

Wednesday, September 2, 2009

More Extreme Artwork


I guess not only am I hooked on these little beauties, but my kids keep putting in more requests. I decided to try and add some color to the rocker and I am really pleased with the way it came out.


My oldest is into Black Right now..... So, I tried to come up with some black SU paper in my stash, The flourishes in this night and day DSP reminded me of movement, so I gave it a try and I actually like the way it came out.... So does he... and of course, now I need to make more sk8er Boys..... I tried to use the grommet as the O, but I had too many layers of paper there by the time I tried to place it. I am really loving these stamps for my boys. I just ordered the Decor elements to go on their walls along with the extreme artwork.
Posted by Picasa

Tuesday, September 1, 2009

Dashing Through Christmas Class Still Available


Fun, fast and festive! These cards blend a touch of whimsy and tradition with quick folds andsparkle using the Merry Moments Designer Series Paper and Iridescent Ice heat embossing powder.
The cards are designed to be beautiful, easy and affordable to make, whether you make
a few or alot! Share joy and warmth by sending friends and family heartfelt
greetings with handmade cards this holiday season.

Included in this month's kit

Stamps
• Dasher
• Merriment

Paper
• Chocolate Chip
• Real Red
• Old Olive
• Garden Green
• Very Vanilla
• Merry Moments Designer Series Paper

• Medium Envelops-Very Vanilla
• Silver Brads

Accessories Used and in this class, but not included in the kit
(may be purchased separately)
• Heat Tool
• Iridescent Ice Stampin’ Emboss Powder
• Bone Folder
• Modern Label Punch
• 1/16” Handheld Circle Punch
• Cellophane Bag – Large Flat
• Stampin’ Dimensionals
• Sticky Strip
• SNAIL
• Paper Snips


Ink
• Chocolate Chip
• VersaMark
• Stampin’ Write Marker – Real Red
• Stampin’ Write Marker – Old Olive

Get your class today for only $25.00


Dashing through CHristmas


Optionally, you can purchase your choice of $50.00 in merchandise
and get this class for free.

Introducing My First Christmas Jingle card kit


Get a jump start on your Christmas Cards this year with the first Scrappin Out loud Christmas card kit, Christmas Jingle #1. This kit includes almost every thing you need to complete 24 complete Christmas Cards, with sentiments and embellishments. (Ink and adhesive sold separately) The kit also includes step by step instructions with photographs to get your cards complete in no time at all!! It will look like you spent days crafting these beautiful cards which you can complete in a couple of hours.

Chirstmas Jingle Card kit #1 Only $25.00
24 envelopes
12 sheets 8 1/2 x 11" cardstock
3 sheets of self-adhesive die cuts
3 sheets 6"x6" cardstock
Ribbons, pearls, clips and buttons needed to complete 24 cards

Christmas Jingle Card Kit #1 Plus - Only $35.00
24 envelopes
12 sheets 8 1/2" x 11" cardstock
3 sheets of self-adhesive die cuts
3 sheets 6"x6" cardstock
Ribbons, pearls, clips and buttons needed to complete 24 cards
Four the Holidays Stamp Set ($13.95 value)

Super Christmas Jingle Card Kit #1 - Only $50.00 **Best value
Make twice as many cards for less!!!
48 envelopes
24 sheets 8 1/2 x 11" cardstock
6 sheets of self-adhesive die cuts
6 sheets 6"x6" cardstock
Ribbons, pearls, clips and buttons needed to complete 48 cards
Four the Holidays Stamp Set ($13.95 value)

Add Old Olive and Real Red Ink Pads for only $10.00 ($11.90 value)


Christmas Jingle #1


Posted by Picasa

The Holiday Mini Catalog is Here NOW!


Cover The long-awaited September 1st date is finally here which means you can now order from the fabulous Holiday Mini Catalog. This is the best and big

gest Holiday Mini that Stampin' Up! has ever produced -- jam-packed with wonderful new stamp sets, papers, ribbons and embellishments for Halloween, Fall, Thanksgiving, Christmas and other Winter Holidays. Also included is the fabulous new Build-A-Bear Line of products and a preview of My Digital Studio -- the

revolutionary new digital scrapbooking and crafting software package that will be available beginning October 1st!

You can view and download the Ho

liday Mini Catalog by clicking HERE.

You can view and download the supply

and recipe list for all the projects in the Holiday Mini by clicking HERE.

If you don't already have your own personal copy of the Holiday Mini Catalog and would like one of your very own, contact me and I'll be glad to drop one in the mail to you!

Here is a sneak peek at some of the favorite products and projects in the new catty. Check back often for more ideas, projects and inspiration!


The fabulous new Sweet Centers Stamp Set and Sweet Treat Cups which allow you to put candy or other small

objects directly onto your card or project. You can find these items on pages 6-7 of the Holiday Mini Catalog.

Halloween_2 Adorable and frightening new ideas for Halloween greetings and gift-giving. See pages 9-11 in the Holiday Mini Catalog.


Decorating


Christmas

Fabulous ideas for Holiday

greetings, gift-giving and home decorating, including new Designer Series Papers, new ribbons, new punches, Wood_blocks new rub-ons and so much more. Christmas and Winter Holiday ideas begin on page 16 of the Holiday Mini Catalog.

Simply_adorned The new Simply Adorned line of customizable jewelry. Imagine giving a gift that someone can change-out throughout the year to coordinate with different seasons and occasions, that you made all by yourself!! The new Simiply Adorned line can be seen on pages 32-33 of the Hoilday Mini Catalog. These Items will be available in a few days, so check back often and get an jump start on your gift giving!!


Stampin Up has teemed with Build-a-Bear, to create this Build_a_bear

exclusive line of products include Stamp Sets, Big Shot Dies and Sizzlets and Designer Series Papers. Build-a-Bear Products can be seen on pages 34-37 of the Holiday Mini Catalog.


Creativity goes digital with One of Stampin Up's most anticipated new products: My Digital Studio. Use Stampin' Up!'s exclusive images in this innovative and easy-to-use software studio to make creating cards, photo albums, scrapbooks, and other projects even simpler. Available to customers on October 1st.

If you don't have a Stampin' Up! demonstrator and would like to order any of the items I've shown on this post, simply CLICK HERE to order Stampin' Up! Products 24-7!


  • FREE STUFF! When you host a workshop, you can earn FREE stamp sets, ink, paper, accessories, and more! Check out our Hostess Benefits table to see all you can get.

    SEE HOSTESS BENEFITS

  • EXCLUSIVE PRODUCTS FOR HOSTESSES! Hostesses have the opportunity to earn exclusive hostess-only products that cannot be purchased from the catalog.

  • FUN, FUN, FUN! Hosting a workshop means getting together with your friends, having a great time, and discovering (or rediscovering) a way to express your creativity.

    CONTACT ME TO HOST A WORKSHOP

Top Selling Products from the 2009-2010 Catalog

Wanna know what some of the Top Sellers from the New catty are...........
If you like what you see, just click on the image to order yours now!


5 - Butterfly Punch - (#116629) a perfect match for Flight of the Butterfly stamp set!


4 - Polka Dot Ribbon - comes in all the yummy new In Colors: Melon Mambo, Crushed Curry, Rich Razzleberry, Dusty Durango, Bermuda Bay and Soft Suede (see page 155 in catalog)
Shown here in Real Red

3 - Medallion stamp (#115223) - this large background stamp packs a wow on any paper project idea

2 - Dasher (#116816) And he is only $8.95

1 - In Color Markers (#116329) - the most economical way to get all six In Colors. Then you only need buy the ink pads you will use the most.

Meet Barry the Bat, another Halloween Freebie from Free SVGs

Meet Barry the bat, another Freebie from Free SVGs

Hostess Promotion

Dates: September 1-November 30, 2009

Promotion Details:

We're excited to bring you this sweet deal for hostesses September through November:

  • Host a workshop totaling $250 or more and choose any one item* from the 2009 Holiday Mini Catalog for only $10!
    *Offer excludes hostess sets and My Digital Studio.

On October 1, when My Digital Studio is released to customers, this offer will become even sweeter:

  • Host a workshop of at least $400 and get My Digital Studio for 50 percent off the retail price (retail price: $79.95; promotional price: $39.97)!
We are thrilled to bring you this very exciting hostess promotion. In fact, we encourage you to contact all of your customers and let them know about this unbelievable offer! Use it to share Stampin' Up! with your friends and family; contact your past and potential hostesses to let them know that it is coming--and start planning your Holiday Mini workshops today!

What are you waiting for??? Hurry and book your workshop today...... call me at 302-670-7980 or email me at angi89@yahoo.com, to save your date!

Stampin' Up! 2009 Holiday Mini Catalog

Are you ready for some fabulously fun new holiday products? Well, here they are! From now until January 4, 2009!

HolMiniCover-09 You'll find Sweet Treat Cups, Halloween Stamps and Ideas, Seasonal Autumn and Winter Products, New Ornament Punch, tons of Big Shot Dies and more!

PLUS: There are two new hostess stamp sets that you make choose from (along with the main catalog.) A level one & a level two.

In addition, Stampin' Up! is launching several new product lines in the 2009 Holiday Mini Catalog:

1. Simply Adorned Charms and Chains: Currently not available to order. Coming Soon! Watch for further announcements

2. Build-A-Bear Workshop: Stampin' Up! has teamed up with Build-A-Bear Workshop to bring you an exciting, exclusive collections of stamps, designer series paper and Sizzix dies!

3. My Digital Studio: Use Stampin' Up! exclusive images in this innovative and easy-to-use software studio to make cards, photo albums, scrapbooks, calendars, etc. Available starting October 1st.

Download: 2009 Holiday Mini Catalog
Download: 2009 Holiday Mini Catalog Stampin' Supplies

Sunday, August 30, 2009

Extremely Rock'N


I had to make another piece of framed artwork for the kids, since they all fought over the last one..... Again, I was inspired by Sandi McIver for this one.... The stamp is Extreme Guitar, the letters are stamped in Basic Black, I dont know where the stamps came from . The stars are from the SU punch. The papers are misc, from my scrapbook stash and the background behind the rocker is from extreme elements, stamped in Ballet Blue.
Posted by Picasa

Check out this awesome bracelet

Check out this awesome bracelet, made by one of my fellow demos Liz, she used our heart punch to make it and some jump rings, isnt it fabulous???

Black Cat SVG just in time for Halloween


Another Freebie from Free SVGs, dont forget to check out the other Halloween files for purchase!

Learn. How to Make a Pendant With Hodgepodge Hardware

Check out these great pieces of jewelery made by Christy!

Clipped from christynelson.net
Hodgepodge Hardware Pendant

2 pieces oval hodgepodge hardware in silver
2 brads from the hodgepodge hardware were also used to hold it together while it dried
small scrap of double sided designer paper
chipboard heart
classic ink (color rose red)
crystal effects
marker
Hodgepodge Hardware Pendant (reverse side)

Saturday, August 29, 2009

Metallic Pearl Inkpads

Check out these new ink pads from Marvy......


New Colors For FolkArt®
Marvy Uchida
www.Marvy.com

Review by Maria Nerius

This is a new line of inkpads from Marvy Uchida. The inks have a metallic look with a touch of pearl shimmer. This is pigmented ink with a raised inkpad. The top of the inkpad indicates the color of ink. The ink is acid-free, archival and water based. Once dry the ink is water resistant. There are 8 colors in this line: gold, silver, black, blue, red, green, orange, and violet.

Testing Feedback

  • Great colors. The metallic pearl shimmer is very pretty.
  • Easy to clean up. Just soap and water for hands, stamp, and work area.
  • Inkpad is easy to hold in your hand to ink the stamp and also direct to paper techniques.
  • The top of the inkpad is easy to seal onto the inkpad, less change of your inkpad drying out.
  • You can never have enough metallic ink colors. Great for special cards like holiday and graduations.
  • Marvy Uchida inks compliment each other; it’s a brand you can depend on.

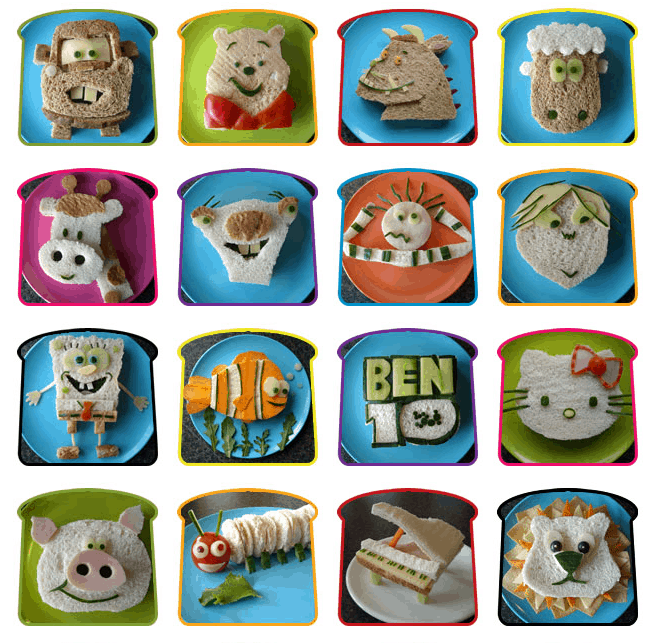
Fun Sandwiches

\
Check out these cute sandwiches, arent they great!
Check out more fun ideas from Funky Lunch. WOW!

funky_lunch


Source: www.livinglocurto.com

Hang*N Out!


Inspired by some cards from Sandi McIver, I have been thinking out some framed art for the boys' rooms for some time now. The stamp is Extreme Dirtbike and the background is composed of Extreme Elements. I used some scraps from the scrapbook room to frame the art and title it. I grabbed an old 5x7 frame from the closet...... The boys argued over whose room it would go in, so I suspect you will be seeing some more of these soon!
Posted by Picasa

Tuesday, August 25, 2009


Provo CraftLet your voice be heard!!! Sign up to join provo crafts research panel!


Provo Craft

Hi there, we at Provo Craft would like to know if you'd be interested in joining our research panel. By agreeing to join, you'd be helping us improve current and upcoming products/services - representing over a million customers (plus there are lots of prizes for helping). The following survey simply asks if you'd be willing to participate in research for key products-this survey will be open Tuesday morning (8/25) to Thursday (8/27). Your involvement in this research panel would include focus group participation, phone interviews, online surveys, etc. - we promise not to bother you too much (once a month at the most) and if you can't always participate, that's okay.

Thanks very much,

Denise Rolfe
Provo Craft Market Research Director

take survey

Provo Craft
Provo Craft
Legal
Use of our web site constitutes acceptance of our Terms of Use and Copyright Policy. Click here to view these items.
Unsubscribe
This email is a Cricut advertisement. You are currently subscribed to receive our email advertisements. If you no longer want to receive our email advertisements Click here to unsubscribe and we will promptly remove you from our mailing list.

©2009 Provo Craft. All rights reserved. 151 E 3450 N · Spanish Fork, UT 84663

Photo Stamping Tutorial


This incredible tutorial was made for a competing stamp company, but it really is incredible and can be used with any stamps!

(Creating amazing art using not so perfect printed photos!)
by Marianne Perry; for FireCracker Designs

Supplies:

Commercially printed photos

Cloth rag

Scrap Paper or Mat to work on

Scrap of Clear Plastic/acetate/transparency

150 and 400 grit sandpapers

Stamps

Acrylic paints (optional)

Stazon or Other Permanent Inkpads

Any black inkpad (optional)

Markers (Galaxy markers work really well with this technique)

Marianne says: I was inspired by an article in the Premiere Issue of ClothPaperScissors, Winter, 2004. Here’s my version of things:

Choose a commercially printed photo that you would normally throw away because it’s blurry, poorly composed or badly lit, etc. I chose this one because the foreground is blurry and uninteresting and the background contains a trashcan and a sign along with the bench.

photo-11

Look through your stamp collection to find designs that might enhance your photo. To audition it on your photo, stamp it in any black ink on a scrap of plastic/transparency/acetate so you can position it over your photo. I chose the birdbath from Pam’s set, A Little Bird Told Me-4×5114. I wanted the birds to be in the sunny light green area of the scene and possibly use some of the stone walkway for the birdbath itself. If you want to keep the clear stamped image, stamp it in the permanent ink: otherwise, you can wipe the image off the plastic and reuse it another time.

photo-2

Wet the photo under running water and shake off the excess. Working over a mat or scrap paper and using medium grade sandpaper like 150 grit, create a border around the photo by sanding off the photo emulsion. Wipe each edge off with a rag as you go while the photo is wet. Rewet the photo with a spray of water if it starts to dry while you are working. Otherwise, the photo starts to feel tacky and your rag will stick to it. Landscape photos turn a brownish color as you sand, get off as much as you can now and then redo the edges again later after you’ve made any adjustments to the size.

photo-3

Now that you have the feel of sanding on the photo, go into the center and with a light touch, use the 150 sandpaper to remove the things you don’t want in the photo. (Remember you were going to throw this picture away anyway so there is nothing to lose, if you ‘mess it up’.) Set the photo aside until it is completely dry and doesn’t feel tacky at all. The 400 grit sandpaper can then be run over the whole photo to dull it down if desired. This will also allow water based paints and markers to stick to it better but you don’t need to do it for acrylics. (Just brush away the debris once the photo is all dry.)

Notice this sanded photo no longer has the bench, sign, or trashcan in it anymore? I’ve also roughed up the edges of the path, so my hand painted images will blend in nicely.

photo-4

Now that you’ve gotten your background ready, place the sample image (the one you stamped earlier on the transparency/acetate) to make sure everything is the way you want it to look.

photo-5

When you are sure you have the background cleaned up the way you want it, you can stamp your image with the Stazon inkpad, right on the photo. Start adding some background interest with inks, other images, or paints (like I’ve done here)photo-6

Since I can’t really paint or draw, I go for an impression of grass, leaves and flowers rather than an exact interpretation of a specific flower. Use any acrylic paints and a small paint brush to dab on a base of green for plants then add strokes, dots, and blobs for leaves and flowers.

photo-7

Markers can be used to cover random sanded marks and for fine details like the birds and shadows on the birdbath.

photo-8

While I was working on this, I decided the sky and several bare branches in the top left were distracting and led the eye out of the picture. I cut off the top, re-wet the edge with a damp cloth and then redid the sanded border above the branches and sky. I rewet and re-sanded the other borders to clean them up. I also added “A Little Bird Told Me…” from the same stamp set in the empty spot at the bottom right. Then I chose a matte and card base for the card.

photo-10

Like any other art, this technique is limited only by our imaginations. You can add cutout images, 3D elements, sewing, etc. You can turn a boring photo into something pretty, hilarious or surreal, depending on what you add or take away. Experiment with whatever art supplies you have!

Cricut Top 40