Good morning everyone, I am back from my business trip and mid-move into our new place. I wanted to take a second to post an exciting new challenge. From Now through the end of September, I am challenging all of my readers to create as many cards for troops as you can. These are cards we sent to the deployed locations for the guys and gals to send back to their loved ones.
Keeping that in mind, Christmas is coming, birthdays, anniversary and any other occassion a deployed military member would want to send home to their loved ones.
I will be offering a substantial prize to the member who creates the most cards for troops from now until 15 September. All you have to do is create your donations, email me pics of your donations and send them to me, as well as mail them to me so that I can get them to our huge cards for troops event on New England, the last week in September. How does $50.00 in SU merchandise sound?
So what are you waiting for? start creating. Send me a photo of your art work to angi89@yahoo.com and get them in the mail, post marked before 15 Sep 09. The person who donates the most cards, will receive $50.00 in Stampin Up merchandise!!
Sunday, August 9, 2009


Friday, August 7, 2009
Dont forget this month's specials!!!
Special #1 – Recruiting Special
Special #2 – Summer Cookout Set Special
Special #3 – FREE buttons!
Special #4 – a Brand New Growth Chart
Dryer Sheet tutorial
Fellow Stampin Up demo Sandy Hoefakker created this fantastic dryer sheet tutorial. Check it out!
 Here is a very interesting technique to try. The Dryer Sheet technique. This will give your project a whole new look!
Here is a very interesting technique to try. The Dryer Sheet technique. This will give your project a whole new look!Supplies
Stampin' Up! stamps and inks as desired
Stampin' Up! Glue Sticks
Dazzling Diamonds Glitter
Scissors
Card stock required for finished project
Used dryer sheet (AFTER it has been run through the dryer)
Stampin' Up! stamps and inks as desired
Stampin' Up! Glue Sticks
Dazzling Diamonds Glitter
Scissors
Card stock required for finished project
Used dryer sheet (AFTER it has been run through the dryer)
 1. Complete all stamping on the item that you are going to apply the dryer sheet to.
2, Cover the whole design edge to edge with the glue from the glue stick.

3. Carefully apply the dryer sheet so that it covers the entire surface and has no bumps or wrinkles. Smooth down without getting too sticky.

4. Trim excess dryer sheet off the edges.
5. Put design piece into a Powder Pal tray and sprinkle Dazzling Diamonds glitter over the top.
6. A lot of glitter! Then gently use your fingers to press the glitter into the dryer sheet design.


6. A lot of glitter! Then gently use your fingers to press the glitter into the dryer sheet design.

7. Carefully tap off excess glitter and stand back and admire your handiwork.

Wednesday, August 5, 2009
Today's freebie from SVG cuts
 SVG cuts has come up with this cutie today, isnt it adorable? I can think of all kinds of things to do with this guy!
Creativity Guide
One of my favorite websites lately is Zen Habits. Today's article happens to be about creativity, so I thought I would share it with you! Leo lists all of the creative habits he has found to be useful! Check it out!
The Little But Really Useful Guide to Creativity
“The secret to creativity is knowing how to hide your sources.” - Albert Einstein
Post written by Leo Babauta. Follow me on Twitter.
It’s easier than ever to be creative, to create, to imagine and make what’s imagined become reality.
It’s also tougher than ever, with distractions surrounding us in ways never before imagined.
No matter what kind of creative type you are — writer, painter, musician, marketer, blogger, photographer, designer, parent, business owner — you are likely always looking for inspirations, for ways to let loose your creative genius.
And while there are millions of creativity tips on the Internet, I thought I’d share the ones I’ve found most useful — the ones that I’ve tried and tested and found to be right.
Here they are, in no order at all:
- Play.
- Don’t consume and create at the same time — separate the processes.
- Shut out the outside world.
- Reflect on your life and work daily.
- Look for inspiration all around you, in the smallest places.
- Start small.
- Just get it out, no matter how crappy that first draft.
- Don’t try for perfect. Just get it out there, asap, and get feedback.
- Constantly make it better.
- Ignore the naysayers.
- But let criticism help you grow.
- Teach and you’ll learn.
- Shake things up, see things in new ways.
- Apply things in other fields to your field, in ways not done before.
- Drink ridiculous amounts of coffee.
- Write all ideas down immediately.
- Turn your work into play.
- Play with kids.
- Get out, move, see new things, talk to new people.
- Read wildly different things. Especially stuff you disagree with.
- Get lots of rest. Overwork kills creativity.
- Don’t force it. Relax, play, it will start to flow.
- Allow your mind to wander. Allow distractions, when you’re looking for inspiration.
- Then shut them off when you’re going to create.
- Do it when you’re excited.
- When you’re not, find something else to be excited about.
- Don’t be afraid to be stupid and silly.
- Small ideas are good. You don’t need to change the world — just change one thing.
- When something is killing your creativity, kill it.
- Stop reading creativity advice, clear away everything, and just create.
- Most of all, have fun doing it.
“Sometimes I’ve believed as many as six impossible things before breakfast.” - Lewis Carroll
Monday, August 3, 2009
Awesome Yin Yang SVG
 Beth, from My cricut scrapbooking created this fantastic yin and yang cut file for SCAL.
Sunday, August 2, 2009
Zen Artwork

I have been dying to try some of these decor elements, I have loved the ones I have seen in the catalogs on the mirrors. I couldnt find a mirror that fit the way I wanted, so I just took the letters and put them on one by one in order to move the letters closer to each other and make them fit on this mirror. I love the way it came out. Now I cannot wait to move next week so I can start to decorate the new house with some of the decor elements decorations!

Are you tired of hearing about my zen movement yet? I had an image in my mind of this picture. I wanted to show a beautiful sunset to demonstrate the philosophy of living in the moment. I looked for a stamp that was perfect to demonstrate the idea, but I couldnt find one to fit just the way I wanted it. Just Be is the phrase that came to mind, so I broke into my scrapbook supplies and used some foam letters. The stamp set is from Upsy daisy and the brayer technique, is from Michelle Zindorf, of course!
Finally, I saw a great sun on Michelle's blog that was made with flower petals and it made me think of a giant daisy growing. Part of living here and now, is taking life the way it is and building
it, to make your life beautiful. I couldnt find a stamp set that said
 Bloom where you are planted, which is what i had in mind, but, I really liked the idea, so I broke into my chipboard letters again and used the Bloom sentiment from Bloomin Beautiful. The chipboard letters dont stick super well on the brayered paper, which is kind of good, i think I will remove them as soon as I can find a stamp to replace them with.
I started a beautiful journal to put these pages in, while they are works in progress, I think once I get them just they way I want them, they would look great on teh wall in a frame. What do you think? Have any more ideas for my Zen Journal or Artwork for my walls?

Live Life Full of Love and Embrace it!

 Part of living one day at a time is embracing what is right in front of me every day. I have been meditating on my life, and my mistakes and I have been realizing that I am not perfect and as long as I accept my imperfections and embrace the life in front of me that life is so much more simple.
 Beauty is all around us, in the sky, in the trees, in the flowers, in all the creatures on this earth. I have been trying to feng shui my home a little bit, to rid some of the negative energy. I have always been able to feel the energy of people I am around, why has it taken me so long to realize all the negative energy and clutter in my house was having a negative impact on my life as well! I need to add more beauty to the house, startign with fresh flowers.
During August and September, Stampin’ Up!® is celebrating kids, and we’ve got two great deals for the young and the young at heart.
From August 1 to 31, spend $35 on stamp sets from the Growing Up section of the new 2009-2010 Idea Book and Catalogue (pages 74-90) and choose a FREE package of Designer Buttons - $10.95 Value. You can choose from Playground, Sherbet and Button Latte.


From August 1 to 31, spend $35 on stamp sets from the Growing Up section of the new 2009-2010 Idea Book and Catalogue (pages 74-90) and choose a FREE package of Designer Buttons - $10.95 Value. You can choose from Playground, Sherbet and Button Latte.


From August 1–September 30 only, get the exclusive Décor Elements™ Growth Chart — plus, receive a free applicator tool! The growth chart is $33.95

One of my favorite things as a kid was to watch my growth as my grandfather marked it on the wall in his basement. Now you can do the same with your child, watch how fast they grow and how proud they are of their growth!
Happy Stamping!
Inkscape Tutorial
Penny Duncan created this fantastic inkscape tutorial, using a virtual cricut mat. Check it out!
Saturday, August 1, 2009
Children on a bike SVG
 Amanda K is one of my favorite Cricut designers, she really comes up with some fantastic files! She created this one most recently, isnt it adorable?
Autum Harvest Class

Feel the cheerful warmth of the bold and rich new In Colors while you have a
great time creating this beautiful gift set. Then pass on the cheer when you
share the gifts with a friend, hostess or coworker to add heartfelt warmth to
their home or office.

Products Used:

Stamps
• None

Paper
• Dusty Durango
• Razzleberry Lemonade Designer Series Paper

Ink
• Rich Razzleberry
• Dusty Durango

Accessories Included:
• Autumn Harvest Rub-ons
• On Board Chipboard Book Basics-Small
• Rich Razzleberry Polka-Dot Ribbon
• Medium Envelops-Whisper White


Accessories Not included:
• Sanding Blocks
• Sticky Strip
• Horizontal Slot Punch
• Mason Jar – 1 quart
• Pillar Candle – 3”
• Stamping Sponges
• Tearing Edge (optional)
• 3/16” Corner Rounder Punch
• SNAIL

The cost of this class is $20.00 (plus S&H), which includes the rub-ons and papers and ribbons
needed to complete all 4 projects.

As a second option, you can order the Autumn Harvest stamp set for $23.95 and the
Autumn Harvest Rub-ons for $10.95 and receive the class and materials for FREE!
Total Cost $34.90 (Plus S&H)
Country Living Summer Cookout Kit on Sale Now!


We are excited to announce that beginning today, August 1, the Country Living Summer Cookout Kit is being offered at a 40 percent discount--making it just $14.95! And with plenty of summer left to celebrate, it's a great time to take advantage of this huge discount. The Summer Cookout Refill is also still available at its regular price of $9.95.
Dates: June 15 - August 31, 2009 or while supplies last
Promotion Details
Take advantage of all the Summer Fun the Country Living Summer Cookout Kit can bring to your business. This summer, we've partnered with Country Living magazine to create a unique craft kit, which they will feature in their July 2009 issue. Our goal in furthering our relationship with Country Living is to gain greater exposure for Stampin' Up! and help you find new customers. But this kit isn't just great for business--your customers will love how it can help them create special memories with a fun and convenient, coordinated summer barbeque!
| Item # | Description | Price |
| 118070 | Country Living Summer Cookout Kit | $24.95 |
| 119193 | Country Living Summer Cookout Refill | $9.95 |
The exclusive Country Living Summer Cookout Kit includes the following products:
- 8 die-cut table tents (2 each of 4 colors)
- Die-cut components, bamboo skewers, and envelopes to create 8 shish kabob invitations
- 12 die-cut coasters (3 each of 4 colors)
- 16 die-cut tags (4 each of 4 colors)
- 24 12" x 12" printed food wrapper sheets (12 each of 2 colors)
- 4 printed recipe cards
- 5 yards linen thread
- Ruby Red Classic Stampin' Spot
- Night of Navy Classic Stampin' Spot
- Dig In stamp set (item number 116700)
The refill includes the same items listed above, minus the Dig In stamp set and Stampin' Spots. It's the perfect solution for holding multiple cookouts or one big cookout.
Note: the kit does not include tablecloths, plates, or flatware.
2 Growing Up Promotions Start Today

 Promotion #1 Designer Buttons Offer:
Dates: August 1-31, 2009
Spend $35 on stamp sets from the Growing Up section of the 2009-2010 Idea Book & Catalog (pages 74-90) and receive a FREE package of Designer buttons--a $7.95 value! Eligible buttons are listed below.
| Item # | Page | Description | Retail Value |
| 116313 | 181 | Playground Designer buttons | $7.95 |
| 116312 | 181 | Sherbet Designer buttons | $7.95 |
| 114333 | 181 | Button Latte Designer buttons | $7.95 |
Promotion #2 Growth Chart Special Offer
Dates: August 1 - September 30, 2009
Promotion Details:
Purchase the brand-new Décor Elements Growth Chart, only available August 1-September 30, and as an added bonus, receive a free applicator tool with your purchase (a $1.95 value).
| Item # | Description | Price |
| 117519 | Décor Elements Growth Chart | $24.95 |
Wednesday, July 29, 2009

As soon as I saw this stamp set in the new catty, I knew that I had to have it! Once I got it, I struggled with cards worthy of the blog hop, so I played all weekend with them. I wanted to showcase each herb at least once, so here is what I came up with.
The first card is Lavender which stands for devotion. I used an oval punch, scalloped oval punch and the modern label punch, I also used a scalloped border punch on the bottom. I totally love the Razzelberry Lemonade DSP and the Rich Razzelberry paper and polka dotted ribbon.

The herbs came with the names on the stamps and their meaning, but when I started to stamp, I didnt like the sayings on the cards for some reason, so, I cut them off and mounted them separately!
The second card uses Rosemary which symbolizes remembrance, I struggled with this one for a little while and then decided En Francais was the perfect touchfor the back ground. The sentiment is from teeny tiny wishes and the color is Rich Razzelberry, one of the new in Colors, isnt it gorgeous?

I haven't been able to get enough of purple and green together lately. Basil (blessings) is actually one of my favorite herbs, I love the smell of it. I know I colored all of my herbs purple, but I was having too much fun with the razzleberry! I also love the distressed look, with the torn papers, it adds to the natural look of the card, dont ya think?

Now, if you made it this far, I hope you will sign up to get my newsletter or subsribe to my blog by email and come back later this week for a super-fabulous blog candy give away. I will wait until all the super give-aways for the blog hop are over, so be sure to come back next week! I am getting ready to move into a new house, and I am cleaning out my scrapbook stuff, this is sure to be a great giveaway!
Tuesday, July 28, 2009
Zen and embracing Life
“There is nothing either good or bad,but thinking makes it so.”
- William Shakespeare, “Hamlet”
- William Shakespeare, “Hamlet”
Adapted from a Post written by Leo Babauta.

One of the greatest sources of unhappiness, is the difficulty we have in accepting things as they are.
Without judgment, without wishing for otherwise.
When we see something we don’t like, we wish it could be different —
The root of the unhappiness, according to Buddhists, is Desire. Desire to have things different, desire for something we dont have, desire for something the way it was.....
This means accepting it as the way the world works — as the way things actually are. And try to understand why that is, and embrace it. As it is. Embrace Life, as it is!
This can be applied to whatever you do: whether it be how other people act at work, how your mate acts or reacts to situations, the way the weather is, politics or the way your dinner turned out.
Accept these things as they are, and try to understand why they’re that way.
It’ll save you a lot of grief, because you’ll no longer say, “Oh, I wish things were better"
Does it mean you can never change things? Not at all. But change things not because you can’t accept things as they are, but because you enjoy the process of change, of learning and growing.
Can we make this world a better place? Again, that’s assuming that it’s a bad place right now. But instead, you could say the world is just what it is — and that’s neither good nor bad. You can say that you’ll continue to try to do things to help others, to grow as a person, to make a difference in this world — not because you’re such a bad person now, or the world sucks, but because that’s the path you choose to take, because you enjoy that path.
As you catch yourself judging, and wishing for different — and we all do it — try a different approach: accept, and understand. It might lead to some interesting results.

“Be Content with what you have; rejoice in the way things are. When you realize there is nothing lacking, the whole world belongs to you.” - Lao Tzu
I thought the embrace life set was perfect for this concept. Accept things the way they are, embrace them as they are right now at this very moment....
The first card uses Ruby Red, Pretty in Pink, Regal Rose and Dusty Durango. I embossed the plants first, used the brayer to color the card and stamped the sentiment with staz on, last.
The second card, I stamped and embossed the flowers in the background, I used my brayer and Rich Razzleberry (dont you love that color?) on top of the embossed flowers, stamped in clear embossing ink. I then stamped and embossed the flower outlines, sponged on the color, added some white ink and some crystal effects, added the pearl after cutting them out and adhering them to the card. I used the Scallop Oval sizzix die to add something to the center (as much as I love razzelberry, it was too much), I water colored the scalloped part of the oval with razzelberry and glued the flowers to the frame. I also distressed teh oval a little bit. Eh, I am not really happy with how it came out, its not the look I was going for, but, It is what it is, I embrace it ;)
Want a good laugh?
If you haven't read my other blog yet, and you want a good laugh, be sure to check it out.... My kids always do something to make me laugh!~http://angi-mylifewiththreeboys.blogspot.com
Watering Can SVG
 Cathy from Cathy's corner created this fantastic file and allows free sharing, click on the can to download and be sure to check out Cathy's corner for more great files!
Unmounting your Stampin Up Wheels
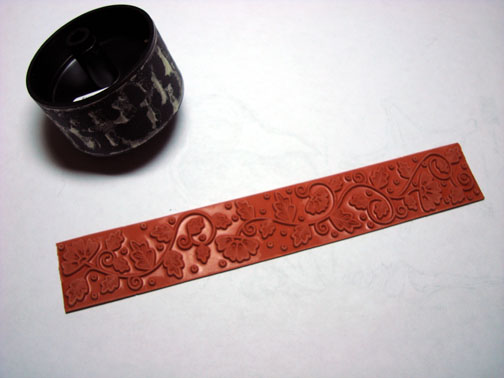
I found this post on one of my favorite blogs today. Michelle Zindorf is the best brayer artist I have ever seen.
If you have ever seen her work, she has a style that is undeniably hers and is easily recognizable!Michelle is extremely generous with sharing her work and tutorials and travels the country to do brayer workshops that sell out across the country.
Michelle doesnt like to use the wheels (kind of funny since she uses the brayer all the time, they kind of do the same thing, he he) So, she unmounts them and uses acrylic blocks to use them as regular stamps.... Hmm, what a concept that is, dont ya think?
Here is how it is done. First, take an Exacto Knife and cut right through the seam of the stamp when it is on the wheel. Next peel the stamp off of the wheel. (they come off very easily, accordint to Michelle) If there is glue stuck to the back of the stamp, peel it off. Michellle reports that she just rolled the glue off with her finger.
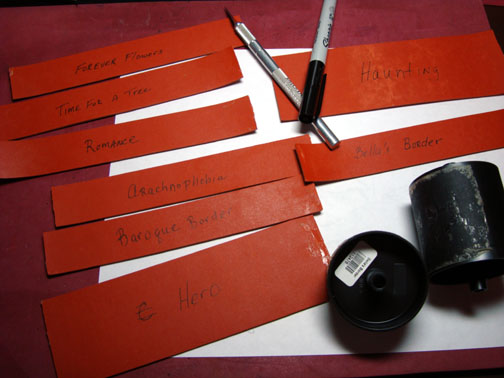
Next, she took a permanent marker “Sharpie” and wrote the name on the back of the stamp.
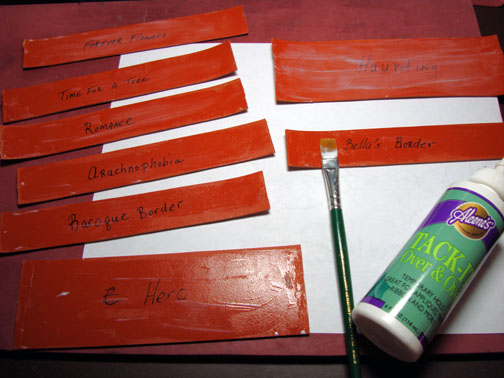
Next, she applied a thin coat of Aleene’s Tack it Over & Over Glue on the back of the stamp with a small paint brush, right over the name she wrote on. The glue dries clear so you can still see the name.
Let this glue dry for about 1 hour, at least. The Glue stays tacky so your stamps will now stick to an acrylic block (I use a 4.5″ x 7″ block) and you can take them on and off. You will not have to apply this tacky glue to the stamp again until you have used this stamp about 50 times.
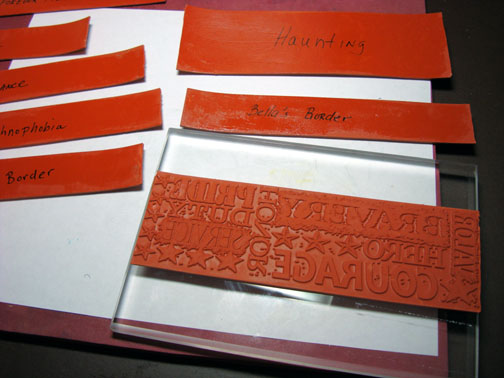
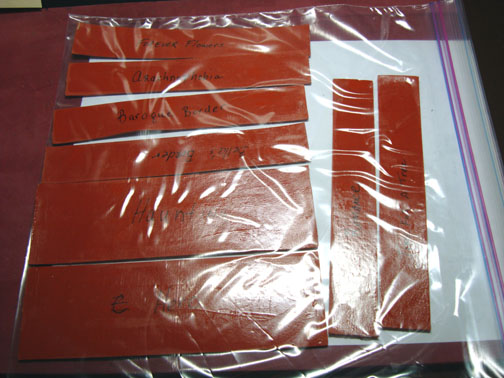
She stores them in a large zip lock baggie. They stick right to the inside of the bag. You can clearly see the name of the stamp through the baggie. She also puts a reference sheet in the bag with them and a reference sheet in her stamp binder.
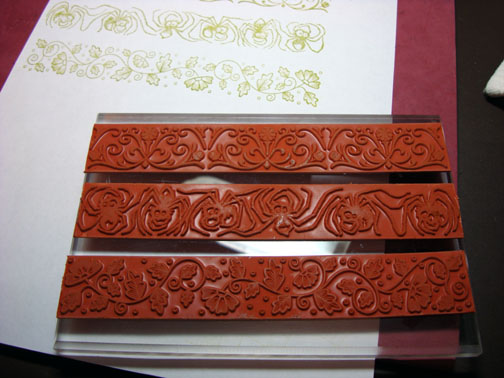
If you unmount a bunch at one time you can stamp a few at one time on plain paper to make your reference sheets.
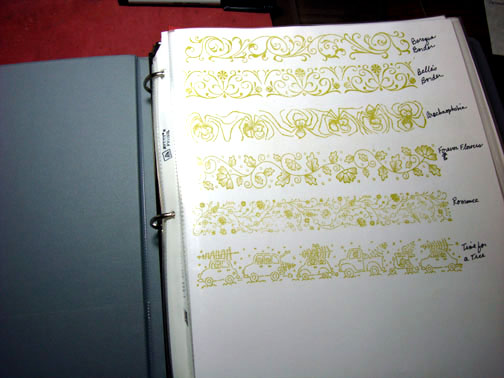
this is photo of her Current Stampin’ Up Stamp binder. This binder holds a reference sheet for all of her Stampin’ Up stamps. When she gets a new set of Stampin’ Up stamps I copy the sticker sheet before I assemble my stamps to the blocks and the copy gets put in my binder. Takes very little time. The binder is so nice to have to flip through to see what she has.  (this is a great idea that I have seen several demos use. Since I didnt start out that way, I took the old catalog and tore out the pages to put inside the lid of the stamp sets to easily see what stamps go in what case, you could just as easily put another sheet in a binder for easy reference of all your stamps without having to dig through them all!
I hope you have found this tool time tip helpful. I certainly have! I am not sure yet, if I will unmount my wheels....... but I am thinking about it, it really is a good idea if you dont like the wheels. Also, if you dont have a stamp a ma jig, it probably makes it a lot easier to keep a straight line with these long images, rather than wheeling a crooked image....
Thanks Michelle for sharing this awesome idea!
Here is a link to all of Michelle's Tool Time posts: http://zindorf.blogs.splitcoaststampers.com/category/tools/
Subscribe to:
Posts (Atom)