Welcome to Scrappin Outloud

Thanks for dropping by! Take a look around and stay awhile. See that little purple box on your left, it contains a summary of recent posts, further down, you will see a box of shared items, these are things I find around the web and want to share with you. Further down on the left you can add a link to your own blog for others to see. I love comments, so feel free to leave some love and thanks for stopping by.

Friday, October 16, 2009

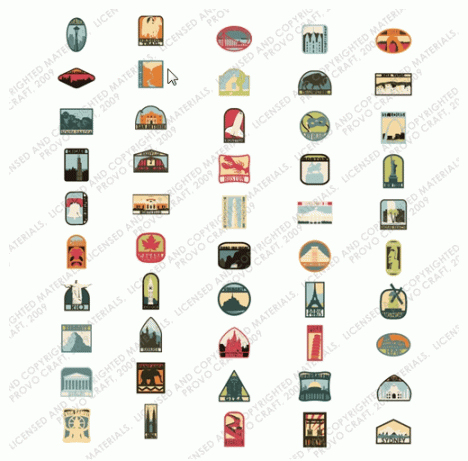
New Cricut Cartridge Sneak Peak


Destinations Cartridge


Here is a sneak peek of another new cartridge from a fellow blogger.... No release date info available!

Featured Video; Making a Background using Marbles

Background using Marbles from StampTV on Vimeo.


Medallion One Sheet Wonder Class to go


\
Make 10 beautiful cards fast using this unique One Sheet Wonder template.
A One Sheet Wonder is a technique for using a single stamped sheet of cardstock cut into
multiple pieces to create a quick-to-make set of cards, 3-D projects or scrapbook pages.
This set features rich colors that span the seasons making it a perfect set to use year round or
give as a gift for any occasion. Not your ordinary One Sheet Wonder, this tutorial will help you make
fantastic cards with detailed accents and embellishments that make each card unique and special.


In this class, you will make:

  • Ten All-Occasion Cards with Envelopes

  • One Coordinating Wrap for the card se

These projects feature the Medallion stamp,Elementary Ribbon Originals

and the colorful Baby WipeTechnique. This One Sheet Wonder makes a beautiful set of cards with

a mixture of rich colors. All the inspiration you need to make thoughtful cards to have on hand or to

give as a gift. When you finish, make the projects again using a different color theme, technique or

stamp set and enjoy the fast and beautiful cards you can create!


You can get all the supplies for this great class, for only $30.00


Create "Wet text" in photoshop


fabulous designer Chris Spooner, shows us how to create this wet-look text in photoshop


Follow this Photoshop tutorial to create an awesome distorted type design. Using a range of Photoshop brushes we’ll create the appearance of printed type that has come into contact with drops of water, breaking up the text with oversaturated drips, runs and splats.

Ink typography design

I was recently out at the clothes store and came across a cool t-shirt by Diesel. The design featured some nice typography that had been treated to some image manipulation to give an awesome effect of wet ink, as if the design has come into contact with drops of water that distorted the print.

I remember originally seeing a similar design by Craig Ward, with his amazing ‘Ink and water don’t mix’ design. I’m not sure whether Craig was also behind the t-shirt art, but I fancied giving the effect a go myself, so I booted up Photoshop and started experimenting. Follow this walkthrough to see the simple steps of creating a similar design, using ready-made brushes to distort some typography of our own.

Start work in Photoshop by creating a new canvas. I’ve chosen to create a landscape poster. Set out a phrase using a classy and sophisticated font, such as Bodoni.

Split the words into their own layers and move them into position to form a balanced layout, align elements of the words with the letters above and below to give structure.

We could get our hands dirty and splash some ink onto some paper and scan in the results, but instead we can take the easy route and use ready-made resources from generous designers and artists. Scour the web for collections of ink splatter brushes for Photoshop. Here’s the selection I personally picked out:

Download and arrange the ABR files into a file. In Photoshop click the tiny arrow in the Brushes palette and select Preset Manager then load all the ink brushes.

Pick out interesting ink shapes from the various brushes and paint odd splats and runs over the type on a new layer. Adjust the size of the brush by using the square bracket keys.

Tailor the shape of the ink splatter towards a similar area of a letter, so for instance if it’s a long ink mark, paint this over a suitably long, straight letter.

Give some letters some major distortion by adding plenty of ink marks, but keep the words legible when viewed at 100%.

Some brushes in the set are created with paint brushes. Since this design is meant to look like it’s naturally distorted by water drops, just pick out the drops, splats and subtle drips.

You can reuse brushes while avoiding any repeating shapes by rotating the brush in the brushes palette. Grab the circular crosshair to adjust the angle.

When the design is nearing completion, download some spraypaint brushes to make use of tiny drips to add some little touches to the design.

Download a grungy paper texture to add some visual interest to the background. Desaturate the image and drop the opacity right down to 15% to leave subtle background tones.

Ink typography design

Take a look over the design at 100% and make any final tweaks. Adjust the opacity of any layers that are taking too much prominence, and use a small soft round brush to blend in specific areas of ink and text.


Featured Project: Full of Life Card

Full of Life Card Send this hopeful message to someone you love. Loaded with subtle color and dimension, it's both eye-catching and contemplative. Ink the words in the sentiment images with different color markers to make individual words stand out.


Win a Pink Journey Cartridge

The Cutting Above blog is giving away a Pink Journey Cartridge this month, get the details by clicking HERE.


Free Halloween SVG


Here is another cute one from Free SVGs, be sure to check back tomorrow, I am finally getting caught up on these babies!!

Another Featured Project; Graveyard Gala Treat Holder


Stamps • Graveyard Gala stamp set
Paper • Going Gray textured card stock • Pumpkin Pie textured card stock • Whisper White textured card stock
Ink • VersaMark® pad • Black Stampin’ Emboss® powder
Accessories • Old Olive 5/8" grosgrain ribbon • Linen thread • Spooky Treats Rub-Ons • Stampin' Dimensionals® • 1/16" Circle punch • 3/4" Circle punch • Sizzix® Big Shot™ • Pillow Box Bigz™ die


New Provo Design Studio Update

Download by clicking HERE!


Want some ideas for carving your Jack-o-Lanter


Click on this little guy to see some great pumpkin carving ideas from BH&G


New Images Available for My Digital Studio!

October 15, 2009

Starting today, seven new My Digital Downloads are available for purchase and use with your My Digital Studio software or other design applications. Several of these images are just in time for Halloween, and are sure to be a treat for both you!

Go to Online ordering to see images and place your orders for these digital downloads today! If you don't have digital studio yet, be sure to visit angi.stampinup.com to order yours today!

Item # Product Name Price
118114 Cast A Spell Designer Series paper - digital download $4.95
118115 Night & Day Designer Series paper - digital download $4.95
118124 Medallion stamp brush set - digital download $1.95
118126 Circle Circus stamp brush set - digital download $5.95
118116 School Days II stamp brush set - digital download $9.95
118121 Great Moments II stamp brush set - digital download $9.95
118122 Pumpkin Patch stamp brush set - digital download $5.95


Thursday, October 15, 2009

Halloween Home Decor


Isnt this great? Fellow Demo Jane created this great little treat! Check her out here for more info!

* Spooky Expressions from Stampin’ Up! Definitely Decorative Catalog (three faces for only $4.95!!)
* Decor Elements Applicator
* Glass Block
* Small Light Set (if you can find orange lights even better)
* Large Ribbon
* Exacto Knife

1. Clean the glass area – if there are stickers, make sure you clean them off.
2. Take the plastic plug and use the Exacto knife to cut an X through it. (My dear son, Michael, did this for me!!!)
3. Lay the block flat on your work surface.
4. Prep the Pumpkin Face piece with the applicator to release it from the grid portion.
5. Lay the Pumpkin Face piece on the glass block and use the applicator to release it from the paper.
6. Make sure to smooth out any air bubbles.
7. Insert the light set into the glass block (remember to cut off any tags).
8. Push the "male" end of the light set through the X’d plastic plug.
9. Decorate with sparkly ribbon. You may want to put orange raffia inside the glass too (be careful – don’t let it stay plugged in too long!).
10. Put it in a window or on your mantle to showcase it!


Provocrafts 100th Cricut Cartridge Celebration

100th Cricut Cartridge

100th Cricut Cartridge


Provocraft is celebrating it’s 100th cartridge “Winter Woodland” with a great giveaway. I was a little late getting this out to you, so be sure to check it out soon!

They are giving away 100 Winter Woodland cartridges over the next 5 weeks, 20 cartridges each week. All you have to do is search for the topic on their message boards and then post underneath it search for 100th cartridge it should come right up. Then you can enter again by posting on your blog about the giveaway.

Here is a link to the product “Winter Woodland” so you can see it:

http://www.cricut.com/shopping/ProductDetails.aspx?id=361&s=1&sc=2

You can also scroll down or search my page for Winter Woodland and look at actual cuts from this cartridge.

Here is a link to the actual forum post as well for this week to get you started:

http://www.cricut.com/messageboard/tm.aspx?m=5248058&mpage=1


New Cricut Cartridge – Paisley


New Cricut Cartridge

A fellow blogger shared a picture of this new cartridge: Paisley

There is no release date info available but enjoy anyway!

Paisley


Today's Video: Baby Wipes Technique

Fellow Su demo Lisa; created this great technique video, enjoy!


Today's Project: From Our Patch to Yours Card

A Halloween greeting from our patch to yours! Our adorable and friendly patterned jack-o'-lanterns are thrilled to be a part of your fun festivities this season.


Free SVG Roller Skate


Been out of town a bunch lately, and didnt have enough Free images to auto post, I will get caught up right away! here is one from Free SVGs for you today!


This week's Deal of the Week

During the month of October, Stampin' Up! will offer several discounted products as "Deals of the Week." No limits and no minimum purchase required.


Week 2 Deals of the Week

Item

Description

Special Price

115961

Perfect Setting Bigz XL die

$25.99

114515

Flower Burst Embosslits die

$5.99

116760

Pop-Up Three Tier Cake Bigz XL die

$25.49


wanna grab one of these great deals, you can get them here

Join Stampin' Up! now!

The holidays are a great time to join the Stampin' Up! family.
  • you'll get a 20 percent discount on your holiday shopping! The Gift-Giving Guide has perfect gift suggestions for everyone-from neighbors to teens. As a demonstrator, you can meet all your shopping needs for 20 percent less.
  • If you hold a few workshops, you could make some extra money to pay for your holiday spending! And it wouldn't have to stop there- you can keep doing workshops after the holidays and continue bringing in extra cash.
  • For those of you who have been on the fence about joining Stampin' Up!, you can buy the Starter Kit as a Christmas present to themselves! (Or ask for the Starter Kit as a gift from a family member.) The Starter Kit is only the beginning-being a demonstrator is a gift that keeps on giving. The "gift" gives you a Starter Kit with fabulous products, an opportunity to make extra money, and the chance to be part of a creative and sharing community of demonstrators who love what they do.
  • Plus, through March 31, new recruits can choose the Digital+ Starter Kit-the new Starter Kit that contains My Digital Studio!

So, what are you waiting for? You can join here or email me at angi89@yahoo.com to find out about all the great benefits of joining my team!


Wednesday, October 14, 2009

Scrapbooking: Cautionary advice from a scrapbook addict

By Linda Fantin

September is an exciting time for scrapbookers. Autumn-themed paper beckons us back to the craft store after a long summer away, as do the Halloween and, yes, Christmas designs. Of course, school has started or soon will, so many of us have kids to embarrass with homemade pencil boxes and college survival kits.

But before we dive back into our hobby (and debt), I thought it would be a good time for a gut check. If you could start over, go "back to school" if you will, what would you do differently?

A version of this question was posed on a popular scrapbook message board -- what would you go and buy? Not surprisingly, most people responded by saying what they wouldn't buy. The thread is a cautionary tale of overconsumption.

So what made the "I could do without" list? Embossing powder, glitter, die-cuts, stickers, so much patterned paper, fibers, ribbon, paint, chipboard, eyelets, stickers, page titles, premade kits, prepackaged stacks of paper, rubber stamps, acrylic stamps, foam stamps, wood stamps, stickers, metal mesh, metal sheets, buttons, rub-ons, markers, watercolor crayons, glitter pens, texture paste, chalks, clay, beads, "all those dang stickers" and much more.

Several women said they would stick with 8-by-11 paper, the rationale being that everything would be less expensive, and the narrower paper and albums take up less space. One woman said she never should have created her own scrapbook room, and another said she
would not scrap at all. (As if !)She would just put her photos in albums.

If I'm honest, I could purge my stash of everything above and still be a happy scrapper. But my to-do-over list is more pragmatic:

Five things I would do if I could start over:

1. Invest in a good camera and learn how to use it

2. Why do I feel the need to stock up on crap no one else is buying? Seriously. Getting supplies at a discount is not reason enough to buy them. (neither is buying them cause they are cute)

3. Learn Adobe Photoshop and Illustrator

4. I buy scrapbooking products because I fancy them. Then I think of how to use them. Same goes for reporting. I gather as much information as I can and then decide what to make of it. It's just not in my DNA to do it in reverse order. The upshot is I'm usually very happy with what I make, but it takes me a long time to finish it. So I get bored. I start looking for distractions. I have so many half-finished pages that they need their own album, not including the kits that just need photos and journaling. This is why I love making cards. Small, simple and I can get one done in a day. If I had it to do over, I would take a more disciplined approach. (wouldnt we all? I have a friend who only buys stuff that goes with pictures already in her hot little stash, she envisions the page right there in the store and buys nothing more than she needs.... How does she do that?)

5. Stay off the Internet!!!! » OK. I borrowed that from another scrapbooker. But it's sound advice. It's easy to get swept up in the latest fad when people post sneak peeks of all the cool new products coming out. And it's hard not to feel inadequate when you compare your wimpy collection of finished pages to the prolific designs in online galleries. (isnt this the truth, if we didnt have the internet, at least we would only garner new ideas when the monthly magazines arrived in our mailbox, and then we had to go out to the store to buy what we wanted. The internet has made it all too easy, dont you think? Although, take me into an AC Moore, Michaels, Hobby Lobby or any scrapbooking or papercrafting store, I can do enough damage, with out the internet.)


I love this article and how true it is, these five things are probably things I would do all over again too. Maybe I would use up all my paper before I purchased anymore. Maybe wear out one technique before buying all the supplies needed for another....

I cant imagine the ladies that said they would never have started, or built their own room, my creativity is my outlet, my room, my mess, its my space and I need its refuge! What would you do differently next time?


Cricut Top 40