Welcome to Scrappin Outloud

Thanks for dropping by! Take a look around and stay awhile. See that little purple box on your left, it contains a summary of recent posts, further down, you will see a box of shared items, these are things I find around the web and want to share with you. Further down on the left you can add a link to your own blog for others to see. I love comments, so feel free to leave some love and thanks for stopping by.

Friday, May 22, 2009

Sizzix Big Shot Video


I found this video on you tube, demonstrating the big shot cutting the Bigz dies. Stampin Up has several exclusive dies that you can't find anywhere else. With the new catalog coming out this summer, one can only guess that some of these babies might be retiring. Hurry and order yours now, before they are gone. If you place a $50.00 order between now and the end of May, I will throw in an advanced copy of the new catalog ($10.00 value) To purchase any of these exclusive dies and get a free catalog, click here

A Fun Flower made of scraps

Fellow Blogger Andrea W, created these fabulous flowers using her paper scraps, aren't they great, What a great way to use up all of our SU paper scraps before the new Catty comes out!

Cut nine squares of different sizes.

Spray each with a little water and crinkle up. Allow to dry.


Layers each one on top of one another, making sure to stagger.
Stick a push pin though your button centre and...

tie on button.

More Sneak Peaks!!

CU_CKproduct_sneakpeek

The June issue of Creating Keepsakes features a die-cut favor box made with the new Stampin' Up! Fancy Favor Bigz XL die from the upcoming 2009-2010 Idea Book & Catalog.

NOTE: This product is not yet available. However, I thought you might enjoy an advance sneak peek. This amazing product along with many more new Stampin' Up! products will be available for purchase on July 1, 2009, when the new Idea Book & Catalog is released.

In Color Rumors: Out of control!!!!


As most of you know, the new Stampin' Up Catalog is due to be released next week (june 1) and we are all chomping at the bit to get our inky fingers on them!

Lots of speculation out there, But some of the rumors I have pieced together for you: see photo to the left for a possible sneak peak at some of the new in colors and Designer series paper. These are the names of some of the fabulous new colors (No guarantee, just what I am hearing on the message boards, these could be DSP or In Colors)

Crushed Curry, Dusty Durango, Soft Suede, Bermuda Bay, Melon Mambo and Razzleberry Lemonade

With all the buzz and speculation over the new catalog, least we not forget, this means the new "Last Chance" List will be out on the same day, the current In Colors, many of your favorite Designer papers and current stamps will be retiring. Hurry and get the ones you want before they are gone! You can order them now, before they are gone, place a $50.00 order and I will throw in the new catalog for free! Visit my SU website now

Happy Stamping!!

Tutorial: Envelope Die - resized to fit a Gift Card

Fellow SU demo and one of tremendous inspirations, Patty Bennett created this fantastic tutorial to alter the sizzix envelope die into a gift card holder, amazing work Patty!!!!


Env 9

step 1: start with a 6x6 piece of DSP

Env 1

step 2: fold it in 1/2

Env 2

step 3: align the folded edge with the 3rd scallop down on the die

Env 3

Env 4

step 4: run it through the BIg Shot machine

step 5: open up the envelope and burnish out the fold/crease with the Bone Folder

Env 5

step 6: seal the edges shut with Sticky Strip and you have an envelope sized to fit a Gift Card!

Env 6

Env 7

Env 8

Wanna get this fabulous Stampin' Up! Exclusive Die?


Thursday, May 21, 2009

His and Her Paper Wallets-class-to-go

A fellow SU demo Patty Bennett, came up with these super fantastic wallets made out of paper. Wanna get your kit, ready with pre-cut paper, accessories and instructions to make one of each?

You can get one of these fantastic kits now for only $25.00, in your choice of several colors available.

Your kit includes paper, and accessories to complete both projects, illustrated instructions and includes an ink pad and embossing powder to complete your kit


Another Cool technique with the crop-a-dile

Not convinced yet? See my last crop-a-dial post here
Wanna get yours now, for only $29.95?

Crop-a-dial ROCKS!

I just love my crop-a-dial, do you have yours yet? How about the Big Bite? Hmmm, you still hammer your eyelets in the middle of the night, when the DH and kiddos are trying to sleep? Check out this video

Not convinced yet? See my last crop-a-dial post here
Wanna get yours now, for only $29.95?

Decorating your home with Stampin Up


To check out our fabulous line of Home Decor Elements, click on the catalog!

Wednesday, May 20, 2009

Tuesday, May 19, 2009

Father's Day Scrapbook Class to go


Celebrate “Dad” this Father’s Day with a scrapbook layout all about him! This wonderfully masculine layout will be the perfect addition to your family scrapbook. Alternately, you could frame it and hang it in a place of honor in your home!


This class-to-go kit includes everything you need to complete a two page 12x12 layout. The class uses simple stamping, cutting and page assembly.

* This class is not available to Stampin' Up! demonstrators. If you are a demonstrator interested in purchasing this product, please email me angi89@yahoo.com.


Stamp of the Month Club


Love all the Stampin Up Stamps and can't decide which ones to buy? Love all the creative ideas you see online, but think you aren't creative enough to do them yourself? This is the club for you. Join the Stamp of the month club and each month, you will get a current Stampin Up stamp-set, complete instructions for several cards/ 3D items and all the paper and accessories needed to complete them.

With the Stamp of the Month club you can purchase a new set of stamps with all the paper and embellishments to complete several projects.

The stamp of the month club will consist of:

  • Run for 6 months
  • Alternate hostesses (you choose the month you want to earn hostess benefits)
  • each month Hostess benefits
  • The hostess month is determined on a first-come, first-served basis, so whomever signs up first gets to be the first hostess etc.
  • The hostess for that month will get at least $20 in free Stampin’ Up! merchandise plus one free Level 1 stamp set.
  • Cost is $25.00/month

Each month you will receive:

  • Stamp Set
  • Kit club instructions to complete several cards/3D items
  • All coordinating paper and embellishments to complete your projects
  • Option to purchase tools needed to complete your project at a discount.

During the hostess month you will also receive:

  • Complete monthly kit
  • $20.00 worth of Stampin’ Up! Products from the current catalog.
  • A Level 1 (minimum) Hostess Set of your choice. (and you dont even have to clean your house!)
  • Discounts on stampin and scrapbooking tools used in the kit of the month

If you choose to gather outside orders or schedule a workshop when it’s your turn as hostess, you can get even more free merchandise.

Conditions:

You must commit to participate in all six months (a credit card guarantee is required) Payment will be due to me by the 5th of each month. No other discounts apply to this very special offer.

Hurry up and sign up for this great Friendly words kit before they are all gone.


Many Marvelous Marker club

Does your “Wish List” include the 48 Stampin’ Write Markers with the storage case?

With the Many Marvelous Marker club you can purchase the entire set over a six-month period and get free Stampin’ Up! merchandise at the same time.

The marker club will consist of:

  • 6 members
  • Run for 6 months
  • Alternate hostesses
  • each month Hostess benefits
  • The hostess month is determined on a first-come, first-served basis, so whomever signs up first gets to be the first hostess etc.
  • The hostess for that month will get at least $20 in free Stampin’ Up! merchandise plus one free Level 1 stamp set.
  • Cost is $25/month

Each month you will receive:

  • One 1/2 color family (6) Stampin’ Up! Markers.
  • One pack of coordinating 12 x 12 cardstock.

During the hostess month you will also receive:

  • Stampin’ Up! Markers Plastic Storage/Carrying Case
  • $20.00 worth of Stampin’ Up! Products from the current catalog.
  • A Level 1 (minimum) Hostess Set of your choice.

If you choose to gather outside orders or schedule a workshop when it’s your turn as hostess, you can get even more free merchandise.

Conditions:

You must commit to participate in all six months (a credit card guarantee is required) Payment will be due to me by the 5th of each month. No other discounts apply to this very special offer. The club begins on June 1st, so if you wanna get your hands on all those fabulous markers, get started now!


$99 Starter kit promotion


Scrapbooking Starter Kit Promotion
Dates: May 1-31, 2009
DOWNLOAD THE KIT DETAILS
Promotion Details
In celebration of National Scrapbooking Month, join Stampin’ Up! as a demonstrator for only $99 with our limited-time Scrapbooking Starter Kit. The Scrapbooking Starter Kit contains the following:
#113510 Schoolbook Serif Alphabet Stamp Set* Retails at: $50.95
#113059 Simply Scrappin’ Petal Party Retails at $23.95
#108697 Earth Elements Assorted textured card stock (12×12) Retails at $13.95
#105240 Whisper White Craft Stampin’ Pad Retails at $8.95
*you can substitute for a set $43.95 or less

Please note: Each of the products listed above may be substituted for like items. Please see the Scrapbooking Starter Kit Order Form for details.The Scrapbooking Starter Kit also contains all the business supplies contained in the standard Starter Kit:
  • Getting Started DVD
  • Getting Started Guide
  • Guest Invitation Postcard (100)
  • Idea Book & Catalog (8)
  • Occasions Mini Catalog (8)
  • To My Hostess Envelope (10)
  • Recruit Folders (5)
  • Recruit Brochures (20)
  • Hostess Brochure (20)
  • Hostess Benefits Form (10)
  • Customer Order Form (50)
HURRY! THIS OFFER ENDS on MAY 31!! For more information, you can send me an email at angi89@yahoo.com or you can sign up online, password angia

Monday, May 18, 2009

Frayed Flower Tutorial

Maize in Montanta created these fantastic frayed flowers, that will work perfect on your scrapbooks and cards! Think about all those old clothes your kids are tearing up, they will be perfect for this! Click on the photo to go to her tutorial

Stamping with Bleach

Using Bleach on my stamp projects in one of my favorite techniques! Check out this you tube video and give it a whirl yourself!

My upline is on Craft Critique!


My upline Erika Martin, made her Craft Critique debut today!!! Check out her review on the crop-a-dial. And, It just so happens that Stampin' Up! carries this awesome, versatile product! What are the odds?


Reported by Erika Martin

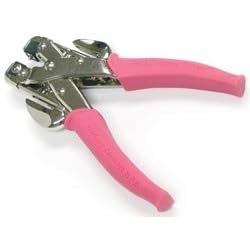
I'm always looking for new ways to create altered art or 3-D projects, but sometimes it's hard to find a tool that will punch through odd materials (think: book covers or CDs). I had looked into purchasing a Japanese screw punch, but the cost had always deterred me. When the Crop-a-dile came on the market, I knew I had found just what I needed.Not only does the Crop-a-dile punch through some of the thickest crafting materials, but it also doubles as a silent eyelet and snap punch and setter. If you're one of those crafters that likes to stay up late at night (when you get your best crafting mojo), but you don't want to wake the rest of the house with those noisy hammer/punch/setter tools, the Crop-a-dile is a great alternative and much easier to use than the passe hammer/mat sets that first debuted on the market when eyelets were all the rage.

Depending on where you look, you can find new Crop-a-diles anywhere from $14 to $30. It's a hefty tool to hold in your hand, but the weight of it is indicative of its sturdy construction. A look over the mechanisms of this tool and you know you have a durable tool that will last a good, long crafting liftetime.

The Crop-a-dile has dual purposes - to punch holes and to set eyelets/snaps.

To use the tool to punch holes, you have your choice between a 1/8 inch and a 3/16 inch hole. You can also set the little slide rulers on each of the punches as a guide for up to 1 inch in depth - meaning, your punch can go up to 1 inch in on the surface you're punching. Simply slide the punch part of the tool over your surface and squeeze the handles together. You'll be amazed at how effortless the punching process is. The sharp pointed tip of the punch makes it go through the surface like a hot knife through butter.

The eyelet/snap setter part of the tool works for both mini and regular size eyelets/snaps. Just as the punch part of the tool is clearly labled with size and measurements, the setter is also clearly labled as to where to put the base of the eyelet/snap and where there top of the eyelet/snap should be placed. The setter and base both swivel out easily by pulling on them to move them around as you choose which size you'd like to use. As mentioned before, using this setter is virtulally noise-free and just as effortless as punching the hole. If you've been holding off on using snaps and eyelets because of the noise and hassle of all the different tools, the Crop-a-dile eliminates those problems. You don't need a mat or a hammer....the Crop-a-dile will do the punching and the setting for you, with the ease of just one tool.

As I've tested this tool out, I'm amazed at how many surfaces the Crop-a-dile will punch through. I love to create altered books, but finding a cost conservative tool to punch through book covers was a problem. The Crop-a-dile will easily punch through most book covers with ease. I've also punched through a small stack of book pages without any trouble, even after I've glued many of them together. My Crop-a-dile has been used by quite a few high schoolers during altered book courses and it still looks and performs like it just came out of the package. It's seen a lot of love and some abuse, but this tool holds up to even the most forbmidable of users (scores of high school freshman boys).


I recently completed a class using old CDs and used the Crop-a-dile to create holes that were used to thread book rings through to make a mini album. Even with something as potentially brittle as a CD, the Crop-a-dile was able to make holes in the CD without cracking, bending or breaking the CD. It seems this tool is not only strong, but gentle as well.

Thick coasters are also something I use quite often for crafting projects and a regular hand held punch only made a dent in the surface, but was not strong enough to go through the entire coaster. The Crop-a-dile punches through the coasters with no difficulty at all. Besides being able to punch with ease, I really like the fact that there are the sliding rulers on the sides of the tool. When creating a project that needs at least two or more holes punched in a straight row, the sliding ruler gives you a stable guide and eliminates the need to measure out and eyeball your punches and hope that you got them straight.


I am always finding new surfaces to use my Crop-a-dile on and I'm sure you'll love yours as much as I love mine.

Pros:
  • Virtually silent punch and eyelet/snap setter. Great for late night crafting or to eliminate all the "extras."
  • Clearly labeled/measured sliding rulers to use as stable guides when punching mutiple holes in a straight line.
  • Will cut through a multitude of thick and hard surfaces, which most hand held punches can't handle.
Cons:
  • Range of depth into a surface only extends up to 1 inch with the sliding rulers and eyelet/snap setter. If you're punching or setting, you won't be able to reach further into your paper/surface more than an inch.
  • Only two sizes of hole punches (1/8 and 3/16 inch).
Interested in this great tool but haven't taken the plunge yet? You can get yours today with free shipping.


Are you missing great content?

Did you know the content on the stampin button is completely different? You might be missing some great tips if you havent checked it out. A lot of this content is different from what you see here. To check it out, just click on the stampin button to the right or click here.

Sunday, May 17, 2009

Tried-and-True Scrapbook Techniques to Keep Your Creativity Clicking Away

From :everything-about-scrapbooking

This series of scrapbook techniques will touch on tags, custom-made page toppers, sanding and hand-made embellishments to dress up your scrapbooking papers.

As a beginner, it's always a good thing to try out different ideas so that you know what you like, what works for you and what are the time-saving ideas you can recycle many times.

Scrapbook Techniques #1: Tags

Tags is one of the favorite embellishment ideas scrapbookers use on their scrapbooking pages.

Tags works wondrous as a page accent. It adds an interesting element to your page and it works like a "mini-canvas" for adding smaller photos, journaling, captions, page titles, decorative mats, thought bubbles and more.

You can easily cut out a tag using a template or draw one using freehand, and then make designs on the cut-out tag based on your needs and preferences.

Tags can come in various sizes, big, medium, small and in various shapes, oval, round, square or rectangle.

Besides using paper for tags, you can cut out fabric, wood, metal, specialty paper and other surfaces.

Pre-cut tags are also readily available at most craft or scrapbook stores.

To finish it off, attach the tag to your page with fibers, brads, staples or ribbons.

Read on for more free scrapbook ideas.

Scrapbook Techniques #2: Custom-Made Toppers

Turn your page title into interesting page toppers by handwriting your own page titles and adding designs to them!

Trust your steady hand to come up with nice page titles or if you want a helping hand, trace over a computer font. Then it's up to you to add flourishes to the page title using paint, colored pencils or chalks and turn it into a decorative page topper.

If you're using freehand to draw out your page title, remember to use a pencil to outline your letters first. Remember to leave enough space between the letters if you intend to use block letter or add some swirls.

Then add in any extra lines, designs or motifs to each letter. When you're done designing, trace over the letters with a journaling pen. Do correct as you go along and then let the ink dry.

Done? Then erase off all the pencil lines and fill in with your selected medium of colored pencils, chalks or paint.

Scrapbook Techniques #3: Sanding

Use sandpaper to rub, buff and scratch away and change the face of cardstock, patterned papers and embellishments.

This is a quick way to add interest, age, soften or dull the surface of your paper or embellishments.

Just remember to place the item you want to sand on a piece of white scrap paper. Because using colored paper, its tint might transfer to the item you're sanding.

Use your dominant hand to hold the sandpaper and the other hand to hold onto the piece of item you're sanding. Use short strokes to distress your item. A fine-grained sandpaper will give a distressed look while a coarse-grained paper with long strokes will give the item a scratched look.

Then use a piece of tissue to swipe away the gritty bits off the sanded item.

Scrapbook Techniques #4: Hand-Made Embellishments

If you want something unique, then you can look at creating your very own embellishment. It'll be one-of-a-kind piece of art.

Embellishments serve to enhance and add interest to your scrapbook pages. And there's abundance of embellishments such as stickers, ribbons, slides, metal frames, shaker boxes to more complex techniques of adding microbeads, rubber stamping, dry embossing and such.

The kind of embellishments you use really depend on your imagination and creativity.

Of course, you can always come up with your own handmade embellishment. It doesn't even have to be complex, sometimes simple ideas work the best.


If the idea of making your own embellishments appeals to you, keep a lookout for leftover beads, plastic flowers, laces, ribbons and so on from your other craft projects that you can use as materials for your embellishments. With handmade embellishments, you'll instantly add a great personal touch to your scrapbook pages. Plus, no one will have the same piece of embellishment as you.
Cricut Top 40