Welcome to Scrappin Outloud

Thanks for dropping by! Take a look around and stay awhile. See that little purple box on your left, it contains a summary of recent posts, further down, you will see a box of shared items, these are things I find around the web and want to share with you. Further down on the left you can add a link to your own blog for others to see. I love comments, so feel free to leave some love and thanks for stopping by.

Tuesday, May 19, 2009

Many Marvelous Marker club

Does your “Wish List” include the 48 Stampin’ Write Markers with the storage case?

With the Many Marvelous Marker club you can purchase the entire set over a six-month period and get free Stampin’ Up! merchandise at the same time.

The marker club will consist of:

  • 6 members
  • Run for 6 months
  • Alternate hostesses
  • each month Hostess benefits
  • The hostess month is determined on a first-come, first-served basis, so whomever signs up first gets to be the first hostess etc.
  • The hostess for that month will get at least $20 in free Stampin’ Up! merchandise plus one free Level 1 stamp set.
  • Cost is $25/month

Each month you will receive:

  • One 1/2 color family (6) Stampin’ Up! Markers.
  • One pack of coordinating 12 x 12 cardstock.

During the hostess month you will also receive:

  • Stampin’ Up! Markers Plastic Storage/Carrying Case
  • $20.00 worth of Stampin’ Up! Products from the current catalog.
  • A Level 1 (minimum) Hostess Set of your choice.

If you choose to gather outside orders or schedule a workshop when it’s your turn as hostess, you can get even more free merchandise.

Conditions:

You must commit to participate in all six months (a credit card guarantee is required) Payment will be due to me by the 5th of each month. No other discounts apply to this very special offer. The club begins on June 1st, so if you wanna get your hands on all those fabulous markers, get started now!


$99 Starter kit promotion


Scrapbooking Starter Kit Promotion
Dates: May 1-31, 2009
DOWNLOAD THE KIT DETAILS
Promotion Details
In celebration of National Scrapbooking Month, join Stampin’ Up! as a demonstrator for only $99 with our limited-time Scrapbooking Starter Kit. The Scrapbooking Starter Kit contains the following:
#113510 Schoolbook Serif Alphabet Stamp Set* Retails at: $50.95
#113059 Simply Scrappin’ Petal Party Retails at $23.95
#108697 Earth Elements Assorted textured card stock (12×12) Retails at $13.95
#105240 Whisper White Craft Stampin’ Pad Retails at $8.95
*you can substitute for a set $43.95 or less

Please note: Each of the products listed above may be substituted for like items. Please see the Scrapbooking Starter Kit Order Form for details.The Scrapbooking Starter Kit also contains all the business supplies contained in the standard Starter Kit:
  • Getting Started DVD
  • Getting Started Guide
  • Guest Invitation Postcard (100)
  • Idea Book & Catalog (8)
  • Occasions Mini Catalog (8)
  • To My Hostess Envelope (10)
  • Recruit Folders (5)
  • Recruit Brochures (20)
  • Hostess Brochure (20)
  • Hostess Benefits Form (10)
  • Customer Order Form (50)
HURRY! THIS OFFER ENDS on MAY 31!! For more information, you can send me an email at angi89@yahoo.com or you can sign up online, password angia

Monday, May 18, 2009

Frayed Flower Tutorial

Maize in Montanta created these fantastic frayed flowers, that will work perfect on your scrapbooks and cards! Think about all those old clothes your kids are tearing up, they will be perfect for this! Click on the photo to go to her tutorial

Stamping with Bleach

Using Bleach on my stamp projects in one of my favorite techniques! Check out this you tube video and give it a whirl yourself!

My upline is on Craft Critique!


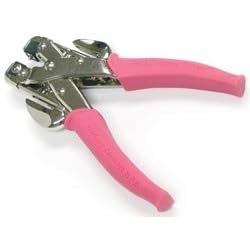
My upline Erika Martin, made her Craft Critique debut today!!! Check out her review on the crop-a-dial. And, It just so happens that Stampin' Up! carries this awesome, versatile product! What are the odds?


Reported by Erika Martin

I'm always looking for new ways to create altered art or 3-D projects, but sometimes it's hard to find a tool that will punch through odd materials (think: book covers or CDs). I had looked into purchasing a Japanese screw punch, but the cost had always deterred me. When the Crop-a-dile came on the market, I knew I had found just what I needed.Not only does the Crop-a-dile punch through some of the thickest crafting materials, but it also doubles as a silent eyelet and snap punch and setter. If you're one of those crafters that likes to stay up late at night (when you get your best crafting mojo), but you don't want to wake the rest of the house with those noisy hammer/punch/setter tools, the Crop-a-dile is a great alternative and much easier to use than the passe hammer/mat sets that first debuted on the market when eyelets were all the rage.

Depending on where you look, you can find new Crop-a-diles anywhere from $14 to $30. It's a hefty tool to hold in your hand, but the weight of it is indicative of its sturdy construction. A look over the mechanisms of this tool and you know you have a durable tool that will last a good, long crafting liftetime.

The Crop-a-dile has dual purposes - to punch holes and to set eyelets/snaps.

To use the tool to punch holes, you have your choice between a 1/8 inch and a 3/16 inch hole. You can also set the little slide rulers on each of the punches as a guide for up to 1 inch in depth - meaning, your punch can go up to 1 inch in on the surface you're punching. Simply slide the punch part of the tool over your surface and squeeze the handles together. You'll be amazed at how effortless the punching process is. The sharp pointed tip of the punch makes it go through the surface like a hot knife through butter.

The eyelet/snap setter part of the tool works for both mini and regular size eyelets/snaps. Just as the punch part of the tool is clearly labled with size and measurements, the setter is also clearly labled as to where to put the base of the eyelet/snap and where there top of the eyelet/snap should be placed. The setter and base both swivel out easily by pulling on them to move them around as you choose which size you'd like to use. As mentioned before, using this setter is virtulally noise-free and just as effortless as punching the hole. If you've been holding off on using snaps and eyelets because of the noise and hassle of all the different tools, the Crop-a-dile eliminates those problems. You don't need a mat or a hammer....the Crop-a-dile will do the punching and the setting for you, with the ease of just one tool.

As I've tested this tool out, I'm amazed at how many surfaces the Crop-a-dile will punch through. I love to create altered books, but finding a cost conservative tool to punch through book covers was a problem. The Crop-a-dile will easily punch through most book covers with ease. I've also punched through a small stack of book pages without any trouble, even after I've glued many of them together. My Crop-a-dile has been used by quite a few high schoolers during altered book courses and it still looks and performs like it just came out of the package. It's seen a lot of love and some abuse, but this tool holds up to even the most forbmidable of users (scores of high school freshman boys).


I recently completed a class using old CDs and used the Crop-a-dile to create holes that were used to thread book rings through to make a mini album. Even with something as potentially brittle as a CD, the Crop-a-dile was able to make holes in the CD without cracking, bending or breaking the CD. It seems this tool is not only strong, but gentle as well.

Thick coasters are also something I use quite often for crafting projects and a regular hand held punch only made a dent in the surface, but was not strong enough to go through the entire coaster. The Crop-a-dile punches through the coasters with no difficulty at all. Besides being able to punch with ease, I really like the fact that there are the sliding rulers on the sides of the tool. When creating a project that needs at least two or more holes punched in a straight row, the sliding ruler gives you a stable guide and eliminates the need to measure out and eyeball your punches and hope that you got them straight.


I am always finding new surfaces to use my Crop-a-dile on and I'm sure you'll love yours as much as I love mine.

Pros:
  • Virtually silent punch and eyelet/snap setter. Great for late night crafting or to eliminate all the "extras."
  • Clearly labeled/measured sliding rulers to use as stable guides when punching mutiple holes in a straight line.
  • Will cut through a multitude of thick and hard surfaces, which most hand held punches can't handle.
Cons:
  • Range of depth into a surface only extends up to 1 inch with the sliding rulers and eyelet/snap setter. If you're punching or setting, you won't be able to reach further into your paper/surface more than an inch.
  • Only two sizes of hole punches (1/8 and 3/16 inch).
Interested in this great tool but haven't taken the plunge yet? You can get yours today with free shipping.


Are you missing great content?

Did you know the content on the stampin button is completely different? You might be missing some great tips if you havent checked it out. A lot of this content is different from what you see here. To check it out, just click on the stampin button to the right or click here.

Sunday, May 17, 2009

Tried-and-True Scrapbook Techniques to Keep Your Creativity Clicking Away

From :everything-about-scrapbooking

This series of scrapbook techniques will touch on tags, custom-made page toppers, sanding and hand-made embellishments to dress up your scrapbooking papers.

As a beginner, it's always a good thing to try out different ideas so that you know what you like, what works for you and what are the time-saving ideas you can recycle many times.

Scrapbook Techniques #1: Tags

Tags is one of the favorite embellishment ideas scrapbookers use on their scrapbooking pages.

Tags works wondrous as a page accent. It adds an interesting element to your page and it works like a "mini-canvas" for adding smaller photos, journaling, captions, page titles, decorative mats, thought bubbles and more.

You can easily cut out a tag using a template or draw one using freehand, and then make designs on the cut-out tag based on your needs and preferences.

Tags can come in various sizes, big, medium, small and in various shapes, oval, round, square or rectangle.

Besides using paper for tags, you can cut out fabric, wood, metal, specialty paper and other surfaces.

Pre-cut tags are also readily available at most craft or scrapbook stores.

To finish it off, attach the tag to your page with fibers, brads, staples or ribbons.

Read on for more free scrapbook ideas.

Scrapbook Techniques #2: Custom-Made Toppers

Turn your page title into interesting page toppers by handwriting your own page titles and adding designs to them!

Trust your steady hand to come up with nice page titles or if you want a helping hand, trace over a computer font. Then it's up to you to add flourishes to the page title using paint, colored pencils or chalks and turn it into a decorative page topper.

If you're using freehand to draw out your page title, remember to use a pencil to outline your letters first. Remember to leave enough space between the letters if you intend to use block letter or add some swirls.

Then add in any extra lines, designs or motifs to each letter. When you're done designing, trace over the letters with a journaling pen. Do correct as you go along and then let the ink dry.

Done? Then erase off all the pencil lines and fill in with your selected medium of colored pencils, chalks or paint.

Scrapbook Techniques #3: Sanding

Use sandpaper to rub, buff and scratch away and change the face of cardstock, patterned papers and embellishments.

This is a quick way to add interest, age, soften or dull the surface of your paper or embellishments.

Just remember to place the item you want to sand on a piece of white scrap paper. Because using colored paper, its tint might transfer to the item you're sanding.

Use your dominant hand to hold the sandpaper and the other hand to hold onto the piece of item you're sanding. Use short strokes to distress your item. A fine-grained sandpaper will give a distressed look while a coarse-grained paper with long strokes will give the item a scratched look.

Then use a piece of tissue to swipe away the gritty bits off the sanded item.

Scrapbook Techniques #4: Hand-Made Embellishments

If you want something unique, then you can look at creating your very own embellishment. It'll be one-of-a-kind piece of art.

Embellishments serve to enhance and add interest to your scrapbook pages. And there's abundance of embellishments such as stickers, ribbons, slides, metal frames, shaker boxes to more complex techniques of adding microbeads, rubber stamping, dry embossing and such.

The kind of embellishments you use really depend on your imagination and creativity.

Of course, you can always come up with your own handmade embellishment. It doesn't even have to be complex, sometimes simple ideas work the best.


If the idea of making your own embellishments appeals to you, keep a lookout for leftover beads, plastic flowers, laces, ribbons and so on from your other craft projects that you can use as materials for your embellishments. With handmade embellishments, you'll instantly add a great personal touch to your scrapbook pages. Plus, no one will have the same piece of embellishment as you.

Saturday, May 16, 2009

Workshop of the Month

Want to make beautiful projects in your own home with your family and friends? In this Workshop, we will create all of these fabulous projects. This workshop includes:
  • Three custom designed projects - 2 cards and one 6" x 6" scrapbook page - which you can mix and match based on the needs of your hostess
  • A simple and "stepped-up" version of each project
  • Step by Step photo's for creating the main projects and tips to make The 6" x 6" Scrapbook page stepped up to an 8 1/2" x 11" and then a 12" x 12" scrapbook page
  • Tips on creating Alternate projects designs using a different stamp set, DP and color scheme

  • So what are you waiting for? You pick the date and the place and invite your friends and family, they don't have to be crafty, I will show them how easy it can be!Don't live in Delaware? That's okay, I will send you everything you need to have your very own Party in a Basket!Click on my calendar to book your workshop today!


    Thoughts and Prayers Kit-to-go


    You asked for it! These beautiful cards are part of my next class-to-go, you too can make these beautiful cards at home! You can purchase all the supplies and instructions to make these beautiful cards like my colleagues have shown here. Click here to find out more information on this cards-to-go class!

    Father's day Ideas

    Check out these super fab father's day ideas I found on Tip Junkie


    Check out Stacy's Father's Day board book. It's completely fabulous and she's also created a tutorial with several ideas and to get those creative juices flowing.


    Karen did an amazing job on this Father's Day vest card with mini pizza box as gift wrap.


    Some major love when into this card! 'I am not left-handed' made this beach chair pop up card using her Sizzix machine.


    'Deb Duz Scrappin' made this creative tie album.


    Inkerprints made this beautiful shirt cuff card & matchbox set.


    I am such a fan of 'Pine is Here'. Her envelope photo book is s

    More frayed flowers


    The frayed flower card Ashely made is darling. These fit perfectly on your cards, don't you think?

    Frayed Flower Tutorial

    Maize in Montanta created these fantastic frayed flowers, that will work perfect on your scrapbooks and cards! Think about all those old clothes your kids are tearing up, they will be perfect for this! Click on the photo to go to her tutorial

    3-D Pop Up Recycled Magazine Flowers!


    I can't get enough of her crafty flowers!!! You can find more information here: 31 Crafty Flowers in 31 Days !

    Finished crop
    /

    More Simple Scrapbook FLowers

    Don't throw those newspapers away until you try this! Today's flower tutorial for 31 Crafty Flowers in 31 Days is a perfect summer activity to do with the kids!


    Finished

    Fabric Flower Tutorials

    Check out this awesome fabric flower tutorial I found here


    Finished


    Friday, May 15, 2009

    Welcome to the May 15th TBD Tour # 5 Stop # 1 Great Grads

    Blog_Tour_05.15.09


    Welcome to the May 15th & 16th TBD Tour.

    This tour features 20 blogs! Each blog will showcase a beautiful project using items from Stampin' Up!'s - Spring-Summer 2009 Idea Book & Catalog.

    Don’t forget to bookmark your favorite blogs as the links that make up this tour will disappear at midnight on May 16th.

    ............................................

    This set is perfect for this time of year, we all know someone who is graduating

    and what a great way to show them we care, make them a personal card!


    Posted by Picasa

    Thursday, May 14, 2009

    SiteLogo Received Creating Keepsakes Readers' Choice Awards for

    Winner: Rubber Stamps, Spring-Summer 2008 Idea Book & Catalog, Write Me a MemoryFont CDs
    Finalist: Watercolor Pencils, Watercolor Wonder Crayons, Stampin' Write Markers, Punches

    Best of all, You can purchase these award winning products through ME!

    Click Here or the Order On-line to order our award winning products! Don't forget to click the SHOP_NOW Button!

    Project 1971: Making a Photo History of the Year You Were Born

    Adopted from photo jojo


    Sveinn Birkir has been collecting images from 1976 to make a visual anthology from the year he was born.

    Isn't that awesome?

    Wanna make your own Project 1976? Search Flickr or Google Image Search for your birth year and see what comes up.

    Look for events that happened and things that came out that year (cars, products, albums, movies). Who was on the cover of Time or Rolling Stone? Who died or was born that year?

    Sprinkle in some family photos and show off your time capsule! Start a photoblog, or print the photos and stick ‘em on the wall.

    Better yet, do this for a pal (or your kid, if you’ve got one of those) and make it into a book for their birthday. Better even than cupcakes, amigo.

    Think about doing a collection from your highschool or other growin up years! Can you say jelly shoes; SWATCH; Coca Cola shirts; white gloves and red jackets? How about a hanky belt, ah the good ol 80's

    Top Notes Purse

    Fellow SU demo, Gayla created this gorgeous purse using my favorite sizzix die "Top Notes". Isnt it adorable!?

    Wednesday, May 13, 2009

    Scrapbook 101: Mixing Patterned Paper

    Does mixing patterned papers scare you? Does staring at rows of papers make you feel clueless and afraid of getting started on patterned papers?

    There's many beginner scrapbookers who have a fear of mixing and choosing patterned papers. With so many choices, colours, and patterns out there, the confusion is real and understandable. Even for me, when I first started scrapbooking, I tend to use mainly cardstock and avoid using much patterned papers. Then I started to look out for companies that offer coordinating lines of patterned papers.

    It's more about experimenting and having fun actually. There's no right or wrong in scrapbooking. Some mixing will look fabulous, some are merely passable and some will instantly make you go, "No...".

    But of course, if there's some tips on how to mix your patterned papers, it'll definitely help things out a lot. Watch this video by Tammy Mitchell and the next time you are at your scrapbook store, you'll be less intimidated about choosing your patterned papers and start getting creative with using patterned papers.

    I'll also keep her tips in mind when I want to mix patterned papers on my next shopping trip. :)

    To start off, a big tip is look to your photos for the dominant colors. Pick up the blue color from your daughter's sparkling eyes or the red from your son's shirt. Choose the color that catches your attention. Then with the dominant color in mind, you can start picking out the patterned papers.

    First paper - Pick a more neutral, solid-colored background paper. If you're feeling more adventurous, you can even pick a very subtle patterned paper as your background paper.

    Second paper - You can go for a bold patterned paper. Feel free to choose a big design but there must be something, usually a color in this bold patterned paper that complements your first paper.

    Third paper - Pick a patterned paper that's more subtle so that it doesn't compete with your big, bold patterned paper. The tricky part is where you have to select a patterned paper that picks up something from both the bold patterned paper and the background paper.

    Enjoy learning about mixing patterned papers!


    How to Distress Your Scrapbook Paper

    By milenna,

    One scrapbooking trend that is becoming more and more popular is the distressed paper look. This rugged appearance is perfect for most scrapbook layout themes. Scrapbook pages for little boys, camping vacations, heirloom pictures and more are perfect for the distressed paper layouts. Another advantage to creating distressed paper layouts is they don’t have to be flawless because the whole idea of the “distressed” look is to make the paper flawed.

    Difficulty: Moderately Easy
    Instructions

    Things You'll Need:

    • Scrapbook paper
    • Sand paper (fine grain)
    • Sanding block (optional)
    • Ink pads (brown, black or darker colors)
    • Sponges
    • Stipple brush
    • Paint brushes
    • Edge distresser
    • Emery board
    • Small spray bottle with water
    • Iron
    1. Step 1

      Select your cardstock for the base of your page layout and decide on your theme. Get your supplies and photos ready ahead of time.

    2. Step 2

      Attach the fine grain sand paper to the sanding block and sand the entire body of the cardstock. Sand as much or as little as you would like but be careful not to sand through the cardstock. Your sand paper will sand off some of the color on the cardstock, which will expose the white core of the pape

    3. Step 3

      Use a black or brown ink pad and gently run the edge of the cardstock across the ink pad in order to “ink” the edge of your paper. You can also use a sponge and rub it along the edge of the cardstock to achieve the same effect.

    4. Step 4

      Cut out your photo mats and crop your photos according to the design of your page layout. Before matting your photographs use the edge distresser to rough-up the edge of the photo mats. This may cause a little tearing so do it cautiously so it doesn’t ruin the photo mat completely.

    5. Step 5

      Use an ink pad and a stipple brush to ink your photo mats so they look weathered. You may even want to curl up some of the damaged edges for a more intense appearance. Another method is to slightly mist the papers with water, then crumple the entire photo mat and straighten it back out with a cool iron. This will permanently set the creases into your paper.

    6. Step 6

      Embellish your page layout with hemp, brads or other rugged looking embellishments. You can use your emery board to sand some of the color off of the brads or rough up the edges of your photos.

    7. Step 7

      Adhere all of the page elements and add your finishing touches, then place the layout into a page protector so it is preserved for your scrapbook album

    The History of Scrapbooking

    Is it any wonder scrapbooking is such a popular pastime? People have always sought ways to remember the important people and events in their lives. In a way, quilts could be thought of as the first scrapbooks. Quilts were made from old clothing and bedding that was no longer useful in its original state. Thus the quilt became a way of remembering those people who wore that clothing or slept under that sheet, and the events of their lives could be passed down in little squares of fabric.

    Today, paper scrapbooks (and Digital Scrapbooking) provide ways for modern record keepers to present the history of their families in a beautiful, meaningful way.

    Scrapbooking Through History

    The scrapbooks of old understandably look a lot different from those we have today, since for a long time photography, color printing and decorating methods we take for granted today were not available to scrapbookers.

    The most common form of scrapbooking in the 1800s took place in what were known as commonplace books, which were little journals where people recorded sayings, events, newspaper clippings and wrote about their hobbies. These books were often homemade and decorated with things like leftover wallpaper.

    Mark Twain designed scrapbooks with gummed pages that you could moisten in order to stick things to them, and he sold nearly 60 different scrapbooks through the Montgomery Ward catalog.

    The first book on scrapbooking was published in the 1880s and various kinds of scrapbooks were very popular at that time.

    Modern Times

    As photographs became more widely available, some people stopped scrapbooking in favor of photo albums. But the resurgence in interest in genealogy in the 1970s sparked a trend back toward making scrapbooks to record family history, past as well as present.

    Today, scrapbooking is one of the most popular crafts out there. Combining rubber stamping, card making, stickers, art, design, journaling, photography and many more crafts, scrapbooking is a versatile and very creative craft.

    A visit to the craft store will offer a huge selection of scrapbooks, papers, die-cuts, stickers, glitter pens, pre-made layouts, stamps, brads, envelopes and much more that can be used on your scrapbooking pages.

    Digital Scrapbooking

    The newest technological development in the world of scrapbooking is the digital scrapbook. Since more people have digital cameras today (or use a scanner to make digital copies of older photos) a whole new market has cropped up around building scrapbook pages entirely on the computer.

    You can add your own borders, layouts, pictures, journaling and other effects, then either print out the finished page, post it online, e-mail it to friends or burn it onto a CD to share with family and friends all over the world.

    While traditional scrapbookers might not like the lack of sensuous appeal of a digitally designed scrapbook page (compared to the funky textures and complex combinations of materials available for paper scrapbook pages), doing your scrapbooks on the computer is a great way to share them with others.


    .

    Scrapbooking without photos

    Scrapbooking Without Pictures
    by Angi Anderson (May 13, 2009)

    The Scrapbooking 101 Program is a SUDSOL program which seeks to assist you at incorporating Scrapbooking into your Stampin Up Business sharing information, tips, and ideas about scrapbooking. If you have specific questions or articles you would like to see in this program, please contact scrap101@sudsol.org

    Occasionally you will miss the shot – maybe you didn’t have your camera, your batteries were dead, or the lighting was bad. Or perhaps, you want to record heritage events in your scrapbook and you simply do not have photos for. Even the most avid scrapbooker like me, can be caught without a camera at a memorable moment. Sometimes I participate in a conversation or experience an emotion I want to capture on paper. Here are a few ways to scrapbook your precious memories when photos aren't available. These are all reasons why you might find yourself scrapbooking without photos.

    Use Memorabilia:


    * Movie/concert/show ticket stubs
    * Restaurant menus, matchbooks, napkins
    * Pressed flowers
    * Ribbon or trim cut
    * Bills for service or receipts
    * Maps
    * Programs
    * Copies of Birth/death/marriage certificates
    * Invitations & greeting cards
    * Military records
    * School/work records
    * Letters
    * Pages from bibles
    * Announcements
    * Newspaper articles
    * Census records
    * Children's drawings, paintings and other various artwork
    * Report Cards
    * Greeting Cards

    I hope this list gets your creative juices flowing, cuz it's just the beginning of a ton of things you can use in your scrapbook when you find yourself without a camera.


    Use Journaling:

    Scrapbooking without photos is a wonderful way to further your journaling skills. What a better way to practice your descriptive writing than to try and re-create a picture with words. Use your thesaurus to find descriptive words that will have your reader picturing it in her mind. This is a time when you have to tell the story completely through your journaling, so take the time to really tell about the events, the feelings of the people who were there, and why it was important to you. Journaling that tells how the people in your story felt, what they heard, smelled, saw, and enjoyed is journaling that completes the story when you find yourself without photos. On your next scrapbook page, ask yourself these questions: Why do I love this picture? What was special about that day? How did I feel when I took this photo? For me, the journaling is the star of any layout, you don't need pictures to tell the story. A picture may capture a thousand words, but your words will convey exactly what you want your readers to know.

    For many scrapbookers, journaling can be a tremendous challenge, here are a few ideas to help you get started:

    * Use a dictionary or thesaurus to find descriptive words
    * Use song lyrics
    * Poetry
    * famous phrases/sayings or quotes
    * greeting cards or greeting card phrases
    * Use a simple list like those "Priceless" commercials
    * Put your memories in a "recipe" for example recipe for the perfect day, recipe for love, recipe for a temper tantrum etc.
    * Think back to elementary school: Who, What, Where, When, How, Why and don't forget those adjectives and adverbs!
    * Use historical facts from the time period
    * Use historical photos from newspapers/magazines/books


    Use Pre-made Embellishments:

    Scrapbooking manufacturers have created embellishments for almost every situation imaginable. A glance through our Simply Scrappin' line, you can find embellishments to match most any emotion.


    Use Printed/Scanned Images:

    For many memories, you can find a photo using a search engine online. For example, I was horrified to lose my film from my trip to San Francisco, but thanks to FLIKR, I was able to use photos on my layout of all the sites and scenes I wanted to remember. Sure, I am not in the pictures, but I was able to scrapbook my thoughts and or feelings about the golden gate bridge by borrowing someone else's photos and putting them in my scrapbook.

    * album covers
    * google photo search
    * FLIKR
    * advertisements

    Use Stamps:
    With Stampin' Up! fantastic lines of stamps, you can find a pictorial image to suit most any memory. Let your stamps be the picture to embellish your memories.


    Don't leave a special memory out of your scrapbook just because you don't have a photo to adhere to a layout. The idea is to use whatever facts you have about a person, family, area, or history to tell the story. Use pictures if you have them, but when you don't, try some of the above techniques. Remember, it's the story of life that you are preserving, not just pictures.

    Tuesday, May 12, 2009

    Bow Tying Made Easy

    Check out this great video tip by Gina K. on tying "Cheater's Bows."

    And this tutorial Fellow SU demo, Di got from a friend Geri, and appropriately dubbed it: Geri's forkin' bow!

    You will need a dinner fork and about 8" of ribbon. You can use less but till you get the hang of it, it is easier to learn with a long piece.

    She used the striped ribbon cause it is easier for you to see, to show how it is done.


    Fold the ribbon in half to make a loop.

    Put the fork in the loop and pull tight.


    I hope I don't lose ya now. Take the ribbon end that is behind the fork and bring it above and over in front of the ribbon in the front and stick it down in the center of the fork in between the tines. The picture probably makes more sense then my words.


    Now take the front ribbon that you crossed the back ribbon over, and bring it up and stick it in the front of fork in the middle hole in between the tines.
    This is what it looks like from the back. (this is the back of the fork!)

    Now just tie the ribbon in a knot and that will hold the center piece tight.

    This is what it looks like from the front...see the cute little bow?


    I trimmed the tails a little and there it is! So cute and what an ingenious idea, I love this forkin bow!

    And check out this tutorial on how to tie a bow three ways for your scrapbook

    Scrapbooking and Stamping Internet survey

    I have developed a survey to help me provide you with content that will keep you coming back! Please take a minute to complete my survey here so I can continue providing quality content that interests you!
    Cricut Top 40